
Shop Now: On-Store Headless Setup
OVERVIEW
Important: This article gives Shop Now: On-Store setup instructions for merchants with headless Shopify stores.
Headless stores have a custom front-end that is completely separate from its back-end performance. In other words, headless stores customize their front-end from scratch to fit their brand. Thus, they use Shopify’s back-end software, but they do not use Shopify’s theme builder to design their stores’ user interfaces (UIs). If setting up On-Store with Shopify's theme builder, please refer to this On-Store setup article instead.
Most of Loop’s interactions with merchants' Shopify stores happen through the back end. However, merchants using Loop’s Shop Now: On-Store feature must connect Loop to their store’s front end to ensure a seamless shopper experience.
How it works
Merchants with headless stores may know about Hydrogen, Shopify’s central framework for building custom storefronts. This framework uses React, a UI development library built from JavaScript programming language.
Setup instructions
Important: Loop highly recommends working with a developer to implement the instructions below, as they require and assume coding expertise. If you do not have developers or need further help, please contact your Merchant Onboarding Manager or support@loopreturns.com.
First, the merchant must get an API key from the store:
Log in to the Loop admin.
Go to Returns management > Tools & integrations > Developer tools.
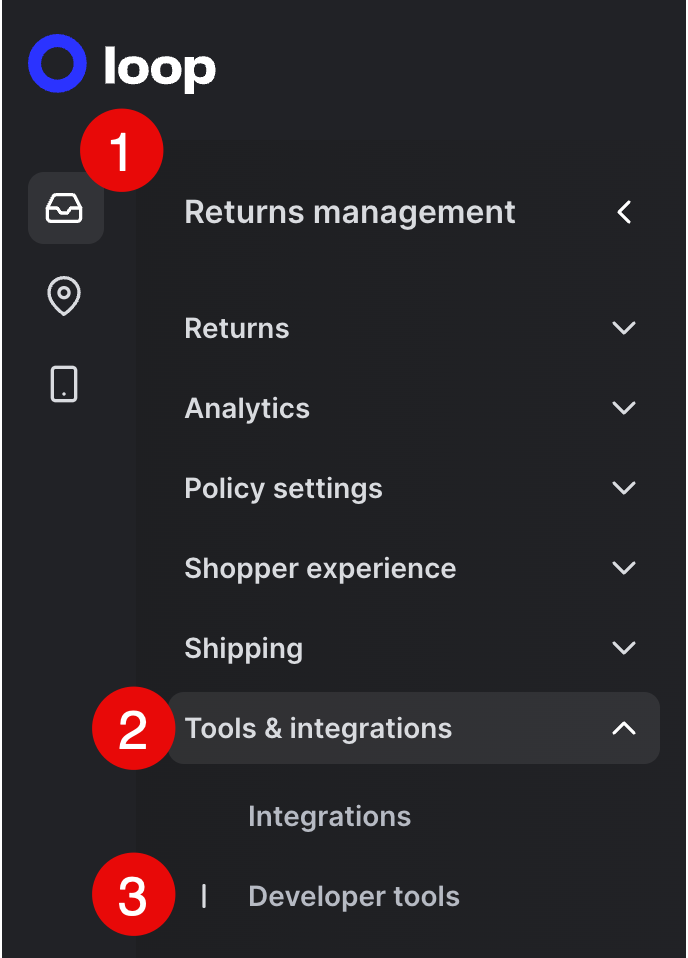
Scroll down to the “API keys” section.
Ensure that the “Scopes” column shows the chosen API key as “Cart” only. (Including more scopes could expose returns data. If there is no Cart-only API key yet, create one.)

Copy the API key from the “Key” column, or keep this window open for later use.
Important: The chosen API key should be completely separate from any other keys because its client-side use will be visible to everyone.
Handle shoppers coming from Loop
At the beginning of the return process, Loop sends shoppers to the merchant's website with a set of query parameters. For a full list of params and an example URL merchants can copy and paste, please reference Loop's On-Store API documentation.
Store the query parameters:
Loop recommends storing certain params for easier retrieval and use later on. To store the params:
Open the store’s website in a new tab or window.
Click the “Shop Now” option, as a shopper might when returning an item.
Find the params in the store’s URL. The params include everything after the question mark (?) and start with “loop.”
Store the received back-end data in some form of client-side storage (Loop recommends the localStorage object). Below is an example of using localStorage in store code:
Tip: If using a state management library such as Redux, Loop suggests also tracking the data there. Doing this can help merchants use the data to find the shopper's credit, covered later in this article.Modify the code to now find the stored data, in addition to the query params. For example:
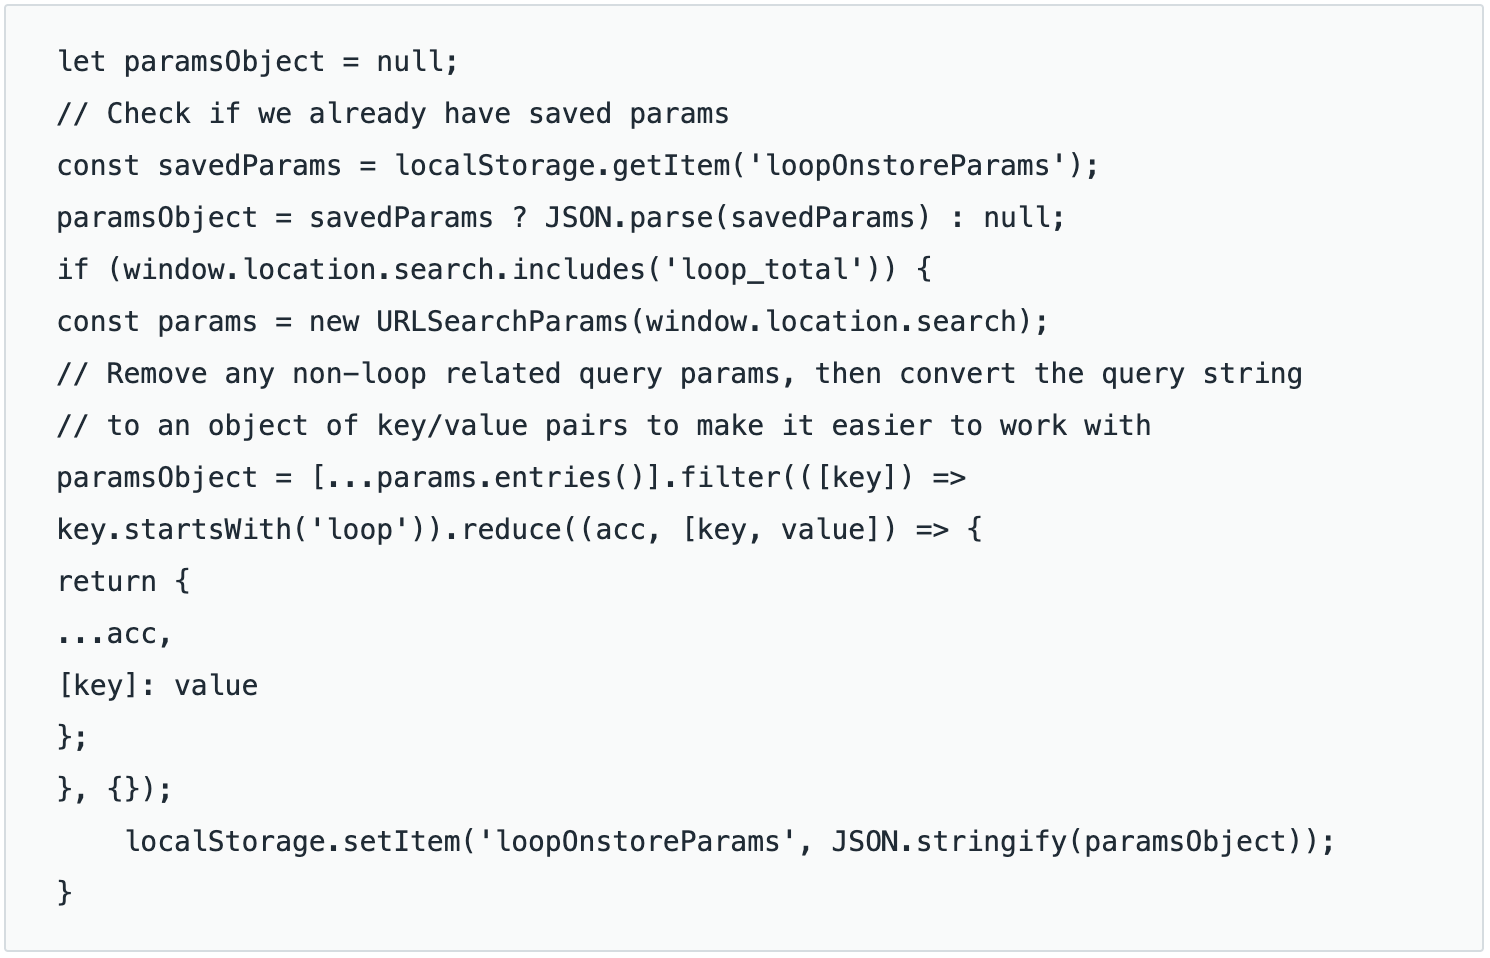
Pulling the stored data ensures that the shopper doesn't get lost if a) they refresh the page or b) the merchant works on a multi-page app.
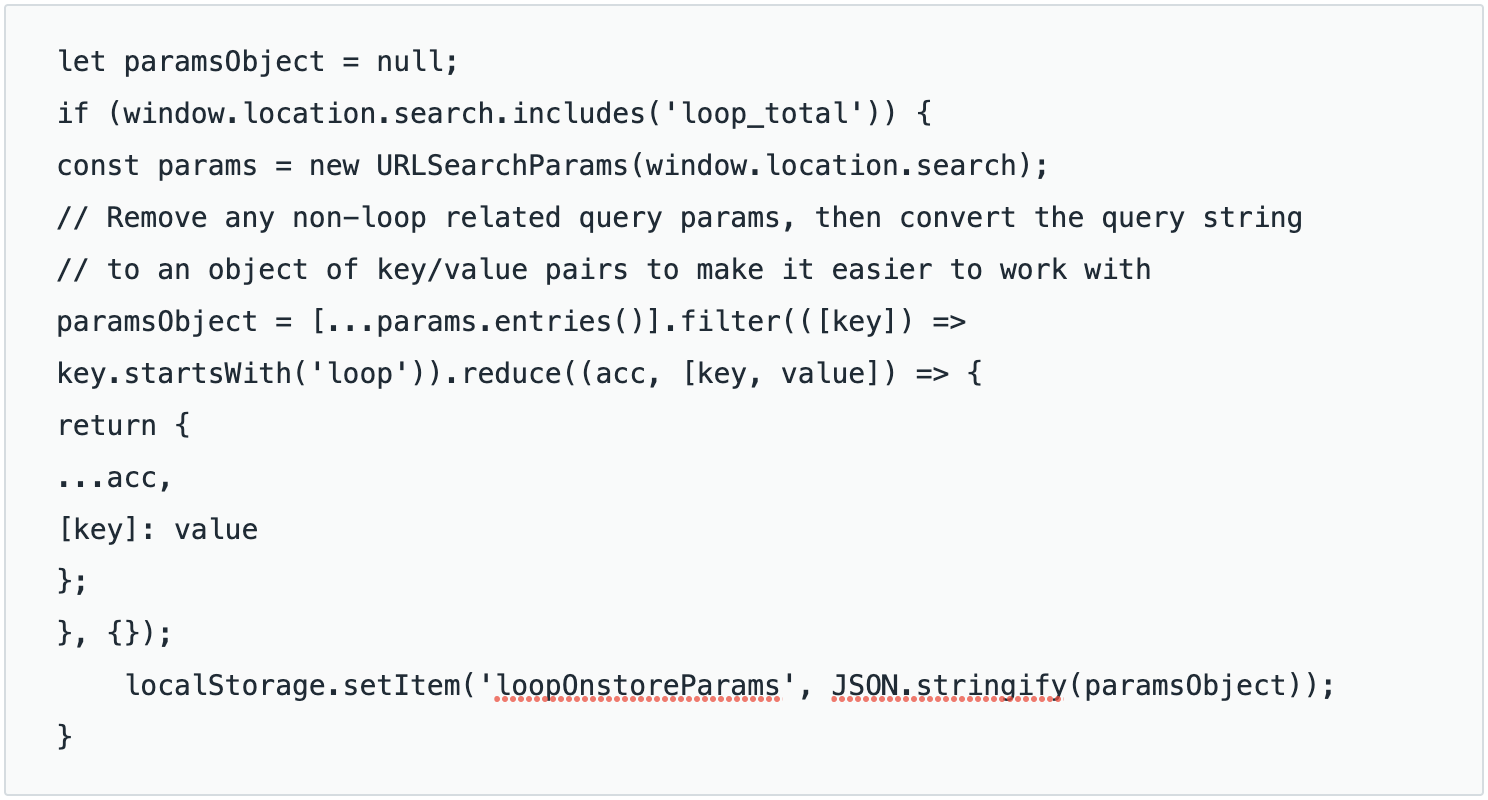
Optional: Clean up the URL params
Once merchants save the data to localStorage, they no longer need the URL params. Loop suggests removing the query to keep working easily and cleanly:
Remove the URL query. For example:
let paramsObject = null;// Check if we already have saved paramsconst savedParams = localStorage.getItem('loopOnstoreParams');paramsObject = savedParams ? JSON.parse(savedParams) : null;if (window.location.search.includes('loop_total')) {const params = new URLSearchParams(window.location.search);// Remove any non-loop related query params, then convert the query string// to an object of key/value pairs to make it easier to work withparamsObject = [...params.entries()].filter(([key]) => key.startsWith('loop')).reduce((acc, [key, value]) => {return {...acc,[key]: value};}, {});localStorage.setItem('loopOnstoreParams', JSON.stringify(paramsObject));// Remove query params from the URL window.history.replaceState({}, '', `${window.location.origin}${window.location.pathname}`);}Clear the shopper's cart (how to do this depends on the cart setup). A clean cart for shoppers shopping with return credit a) can prevent issues with products already in the cart and b) ensures Loop gets everything the shopper adds. For help, please contact support@loopreturns.com.
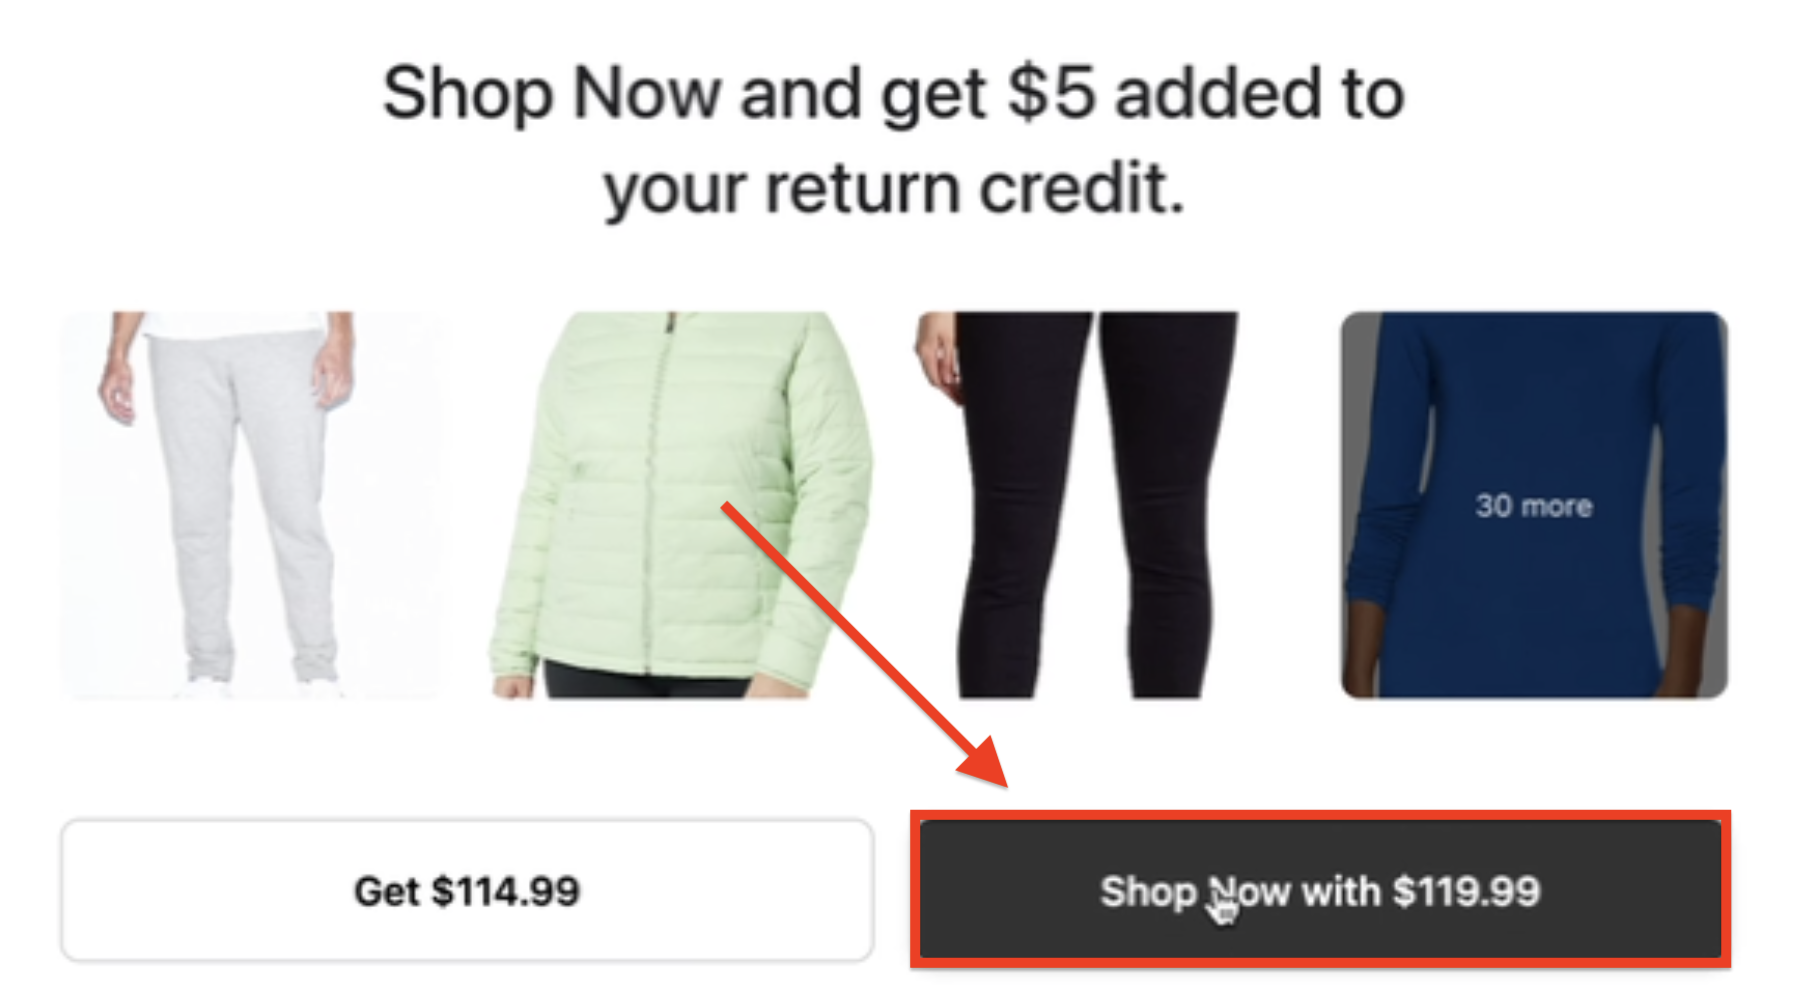
Optional: Show the shopper how much credit they have
To prevent confusion, Loop also suggests informing the shopper persistently that they are shopping with return credit:
Add a fixed element such as a bar at the bottom of the screen, or something similar, to display the credit amount. Merchants can find the available credit amount in the
loop_totalparam within the store code.Add a "Back to Return" button in the code so that the shopper doesn’t lose their place. Merchants can find a URL to redirect them to in the
loop_redirect_urlparam.
Create an On-Store cart
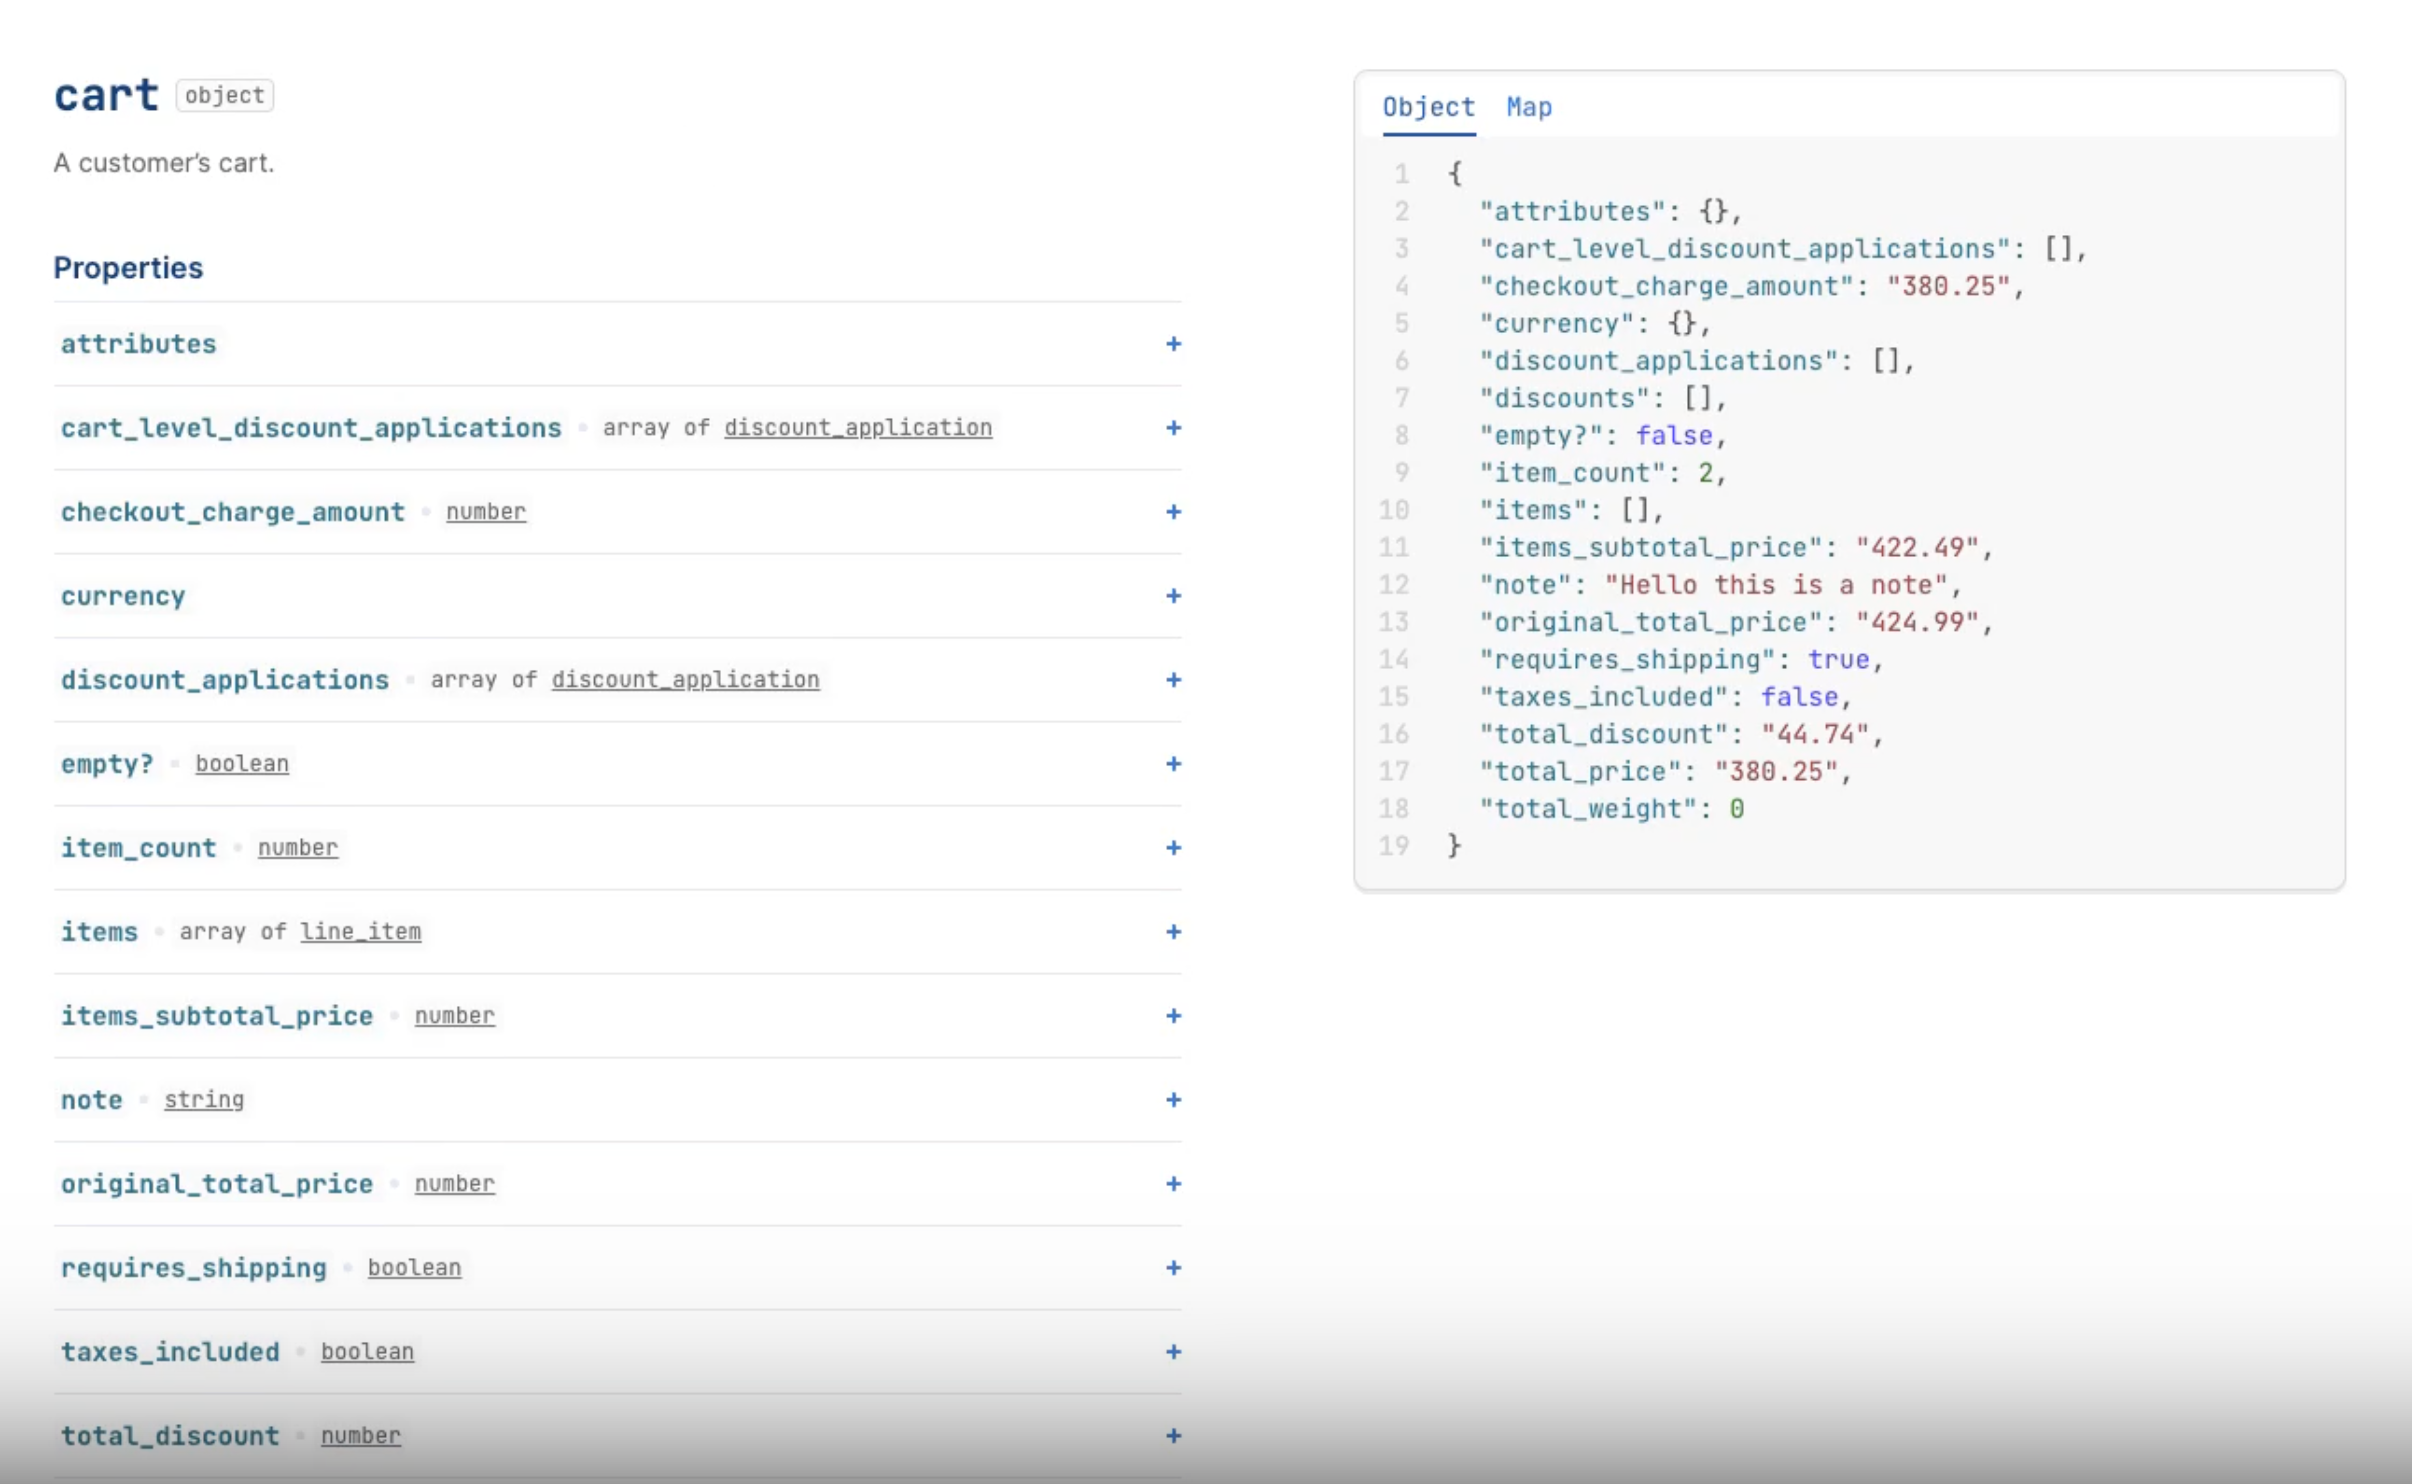
For this step, merchants essentially recreate the On-Store software development kit (SDK) within Shopify, since Loop doesn't have visibility into code on the merchants' side.
Note: Depending on the features included for a headless storefront, merchants may need to send different cart parameters in API calls to Loop.
To create and send shoppers to a separate On-Store cart:
Create a Shopify cart, if one doesn't currently exist (merchants will get variants from this cart to send to Loop's API later).
Click the checkout button and check the following things (code sample beneath for reference):
Confirm in localStorage (or other centralized storage) if the returned params indicate return credit for the shopper.
If return credit exists, stop the shopper from going to their normal checkout.
Get the Shopify variant IDs from the cart. How to get these IDs depends on how the cart is set up. For help, please contact support@loopreturns.com.
// Check if we already have saved paramsconst savedParams = localStorage.getItem('loopOnstoreParams');paramsObject = savedParams ? JSON.parse(savedParams) : null;// How you bind this click handler depends heavily on what tech you're using, // this is vanilla JS to show the basic concept // This assumes a link with the id "checkout" is present on the current pagedocument.querySelector('#checkout').addEventListener('click', (e) => { if (savedParams) { // Stop the user from going to the checkout page e.preventDefault(); // Gather the Shopify IDs // Make POST request to Loop API }});Make an API call to Loop's Create Cart endpoint, entering the variant IDs. Merchants can test this process first on Loop's interactive Create Cart endpoint page.
Find a) the token sent in the code response (merchants will use this token to access and modify the current cart going forward) and b) the return ID from the
loop_return_idquery param.Save the token and the return ID to localStorage, separate from the params data saved earlier. Later, merchants will use these fields to let shoppers return for a second round of shopping.
Prepare to send shoppers back to Loop
Loop then allows the shopper to continue shopping if they would like. The shopper returns to the store with the same params sent beforehand, so your preexisting code will pick that up. After receiving the params, do the following:
While saving the params to localStorage, find the cart token saved earlier.
Check that the return ID paired with that token matches the current return ID.
Make a call to the Get Cart API endpoint to confirm what's currently in the shopper's cart. Merchants will need the store’s API key found earlier (refer to the beginning of “Setup instructions”). If wanting to test the API call first, please visit Loop's Get Cart testing endpoint.
Update the cart in the store to match the shopper's current cart so that the shopper can pick up where they left off.
When preparing to send the shopper back to Loop, once again check that there is a cart token matching the current return ID.
If the return IDs match, use the Update Cart endpoint instead of creating a new cart. Test this call on Loop's interactive Update Cart page.
Send shoppers back to Loop with the On-Store cart
Remove from localStorage the params data saved at the beginning (refer to Step 2 under “Store the query parameters”). This restores the shop to the normal shopping flow.
Clear the shop's cart.
Direct the shopper back to Loop using the token of the On-Store cart created earlier. The redirect should look similar to this code:
https://SHOPNAME.loopreturns.com/#/cart/v2/TOKENScript discounts
Important: This section explains how script discounts interact with Loop. However, due to script discount structure and variability, support is case by case. Loop cannot guarantee support but will help to set these up where possible. The most commonly supported discounts include:
Percentage (%) off a product
Amount ($) off a product
Percentage (%) and amount ($) off a product
Bulk discounts
Buy one get one free (BOGO)
Loop’s Shop Now: On-Store experience can use a merchant’s existing Shopify cart and scripts to determine proper discounts for shoppers’ On-Store orders.
How it works
The shopper adds items to their cart through the On-Store experience.
The On-Store code sends any products and applicable discounts from the Shopify cart to Loop’s core API endpoint.
Loop’s core interprets new cart prices and translates them to discounts in Loop's system.
Setup instructions
Tip: Loop suggests working with a developer for these setup steps.
To set up script discounts for a headless store, review the video below or the written steps beneath it.
In the Shopify storefront API, call a Create Cart mutation to create a cart in Shopify.
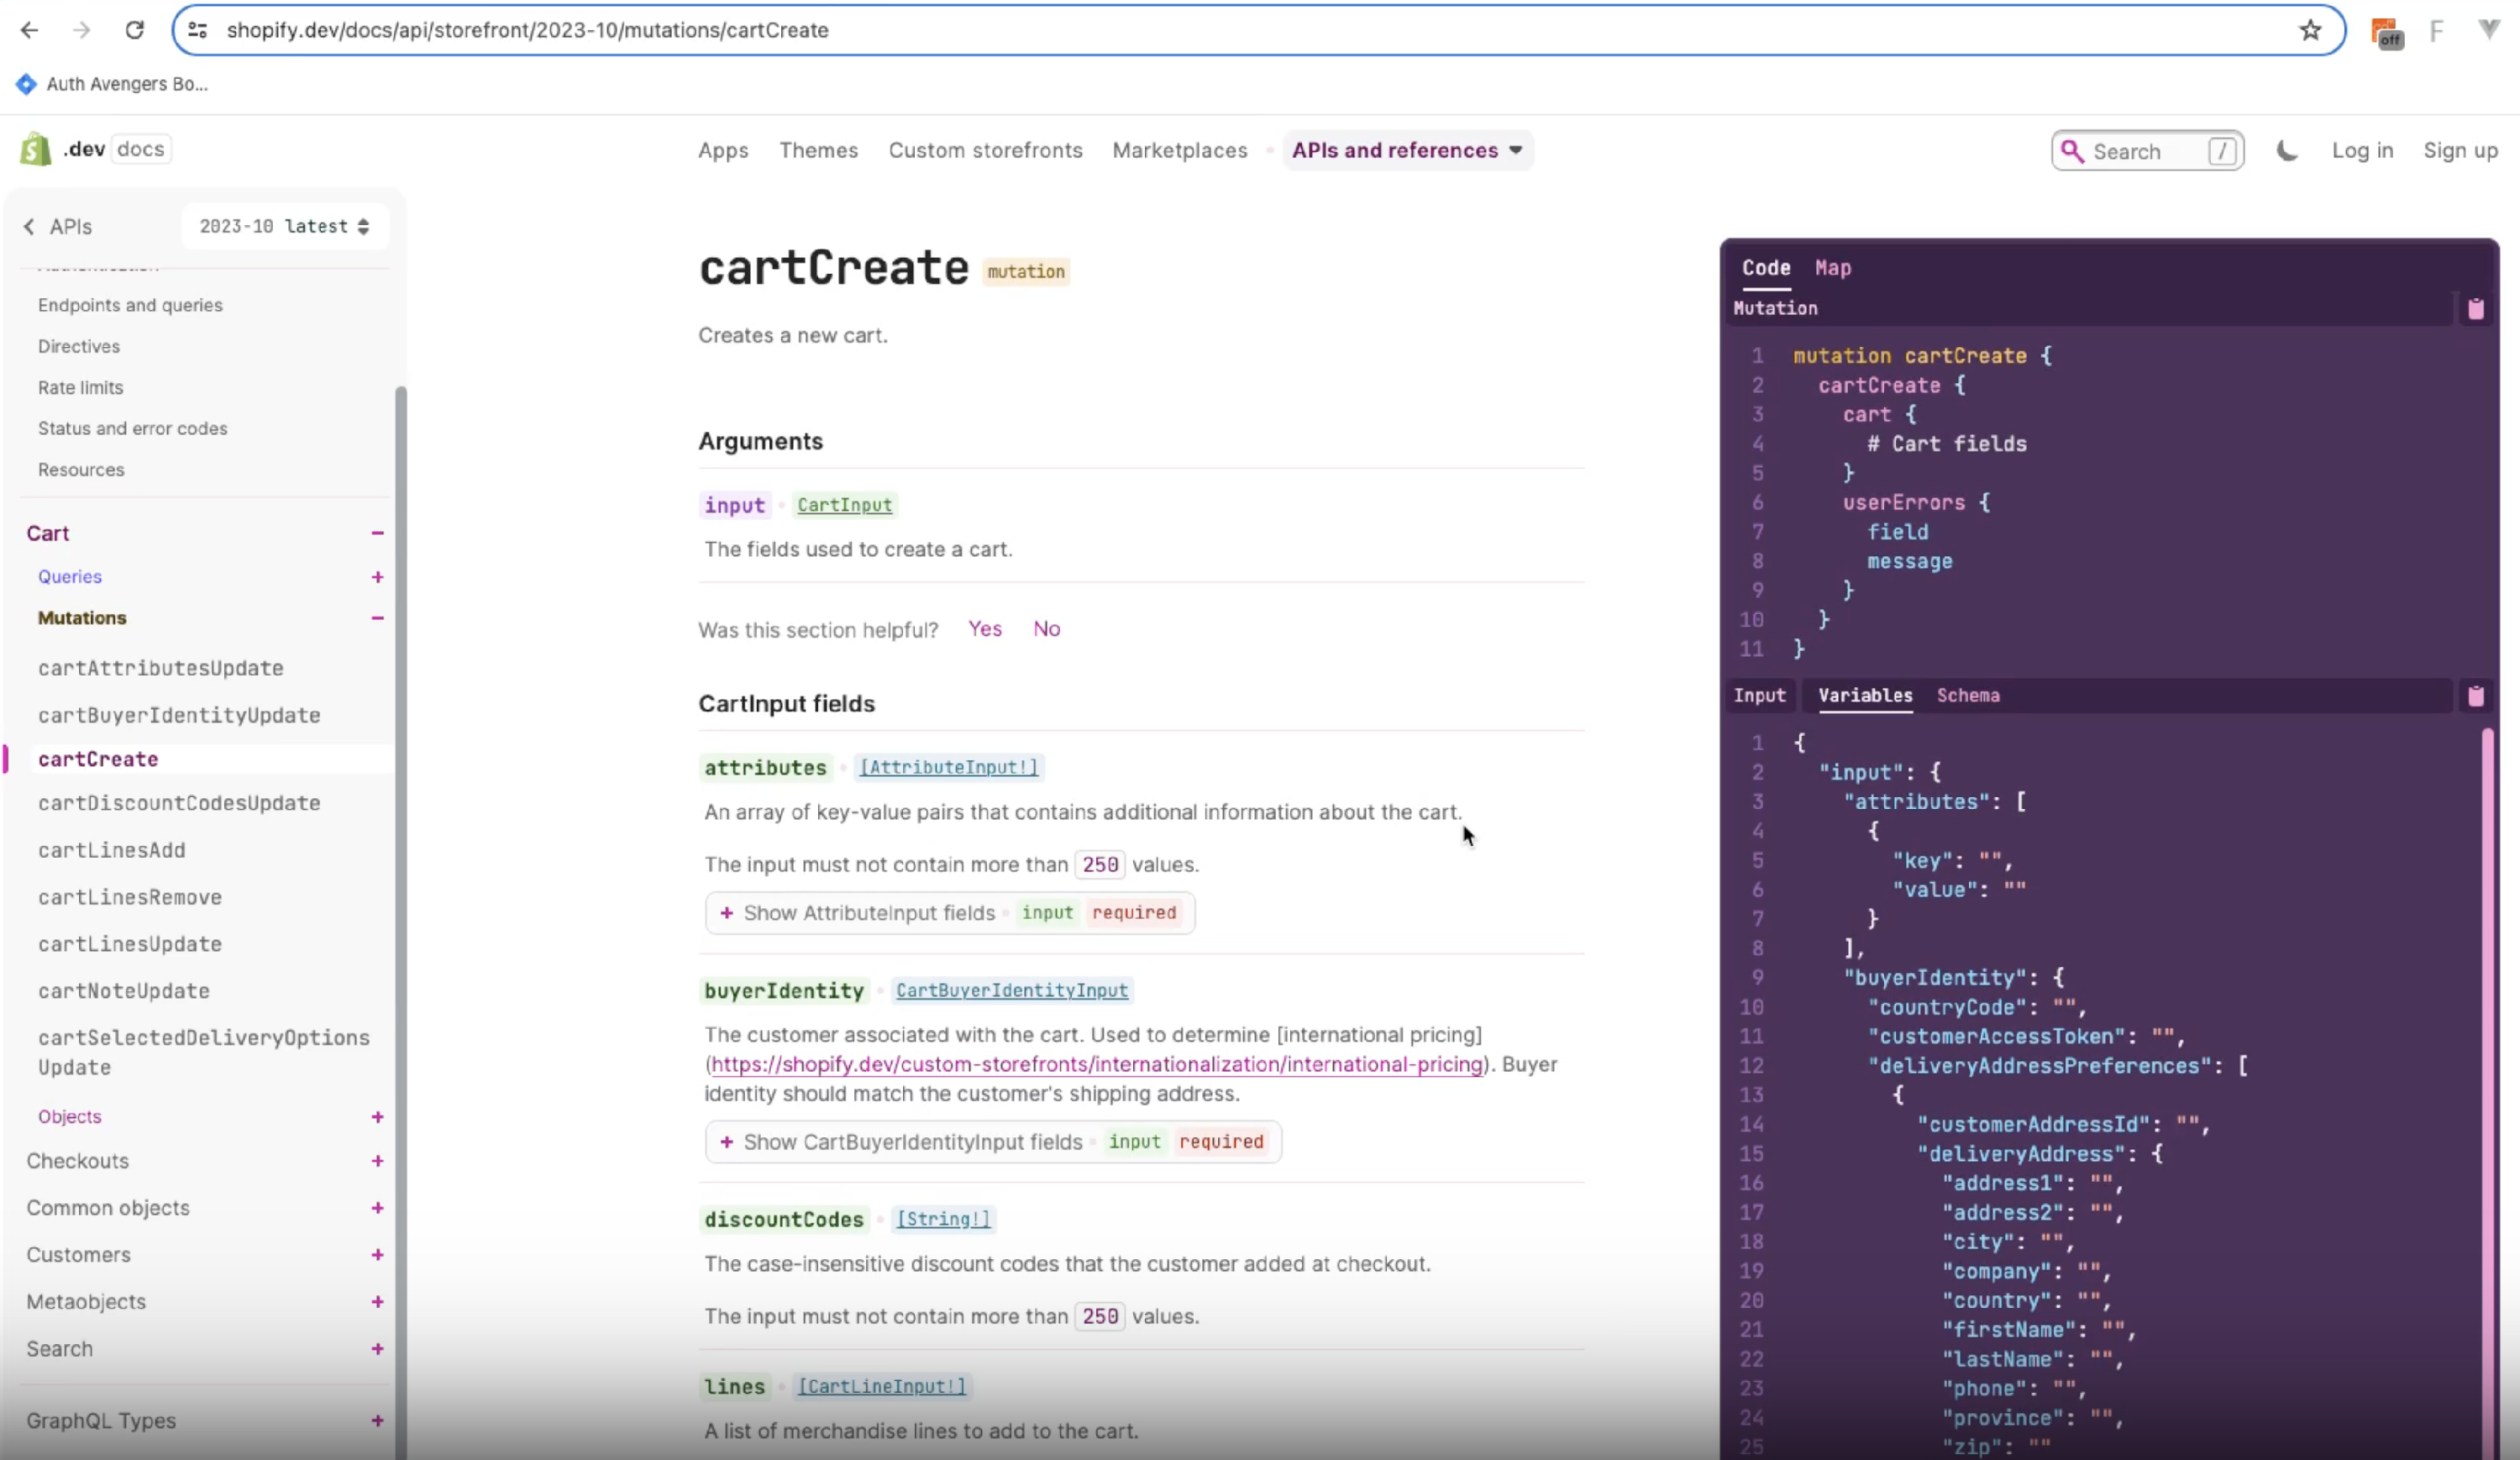
Map the response from Create Cart to a liquid cart object, which the On-Store SDK uses.
Once the cart is created, base64 encode it.
Make an API call to Loop's Create Cart endpoint with the cart from the previous step.
The response from Loop will return a token. Use this token to send the shopper back to Loop to continue the return process by copying and pasting it at the end of this URL destination:
https://<subdomain>.loopreturns.com/#/cart/v2/<token>Tip: Refer to this API document to a) understand the "subdomain" and "token" parts of the above destination, b) understand Loop's interactions with the cart from there, and c) review some testing tips.
Please reach out to support@loopreturns.com with any additional questions.