
Post-Purchase Offers (Beta)
OVERVIEW
Post-Purchase Offers lets you create offer funnels that present upsell and downsell deals to shoppers immediately after they complete checkout — right in the post-purchase experience. This article covers how to set up funnels, configure individual upsell and downsell offers, manage audience targeting, and track funnel performance using conversion and revenue data.
Note: This feature is still in beta. Please reach out to your Merchant Success Manager or support@loopreturns.com if you'd like to join.
Use the menu on the left to quickly navigate this article.
What it is
Post-Purchase Offers is a revenue retention tool that lets you build sequenced offer funnels shown to shoppers after they complete a purchase. Each funnel contains a series of upsell and downsell offers — discounted product recommendations presented one at a time with a countdown timer. If a shopper accepts an offer, the next upsell in the sequence is shown. If they decline, a downsell offer is presented instead.
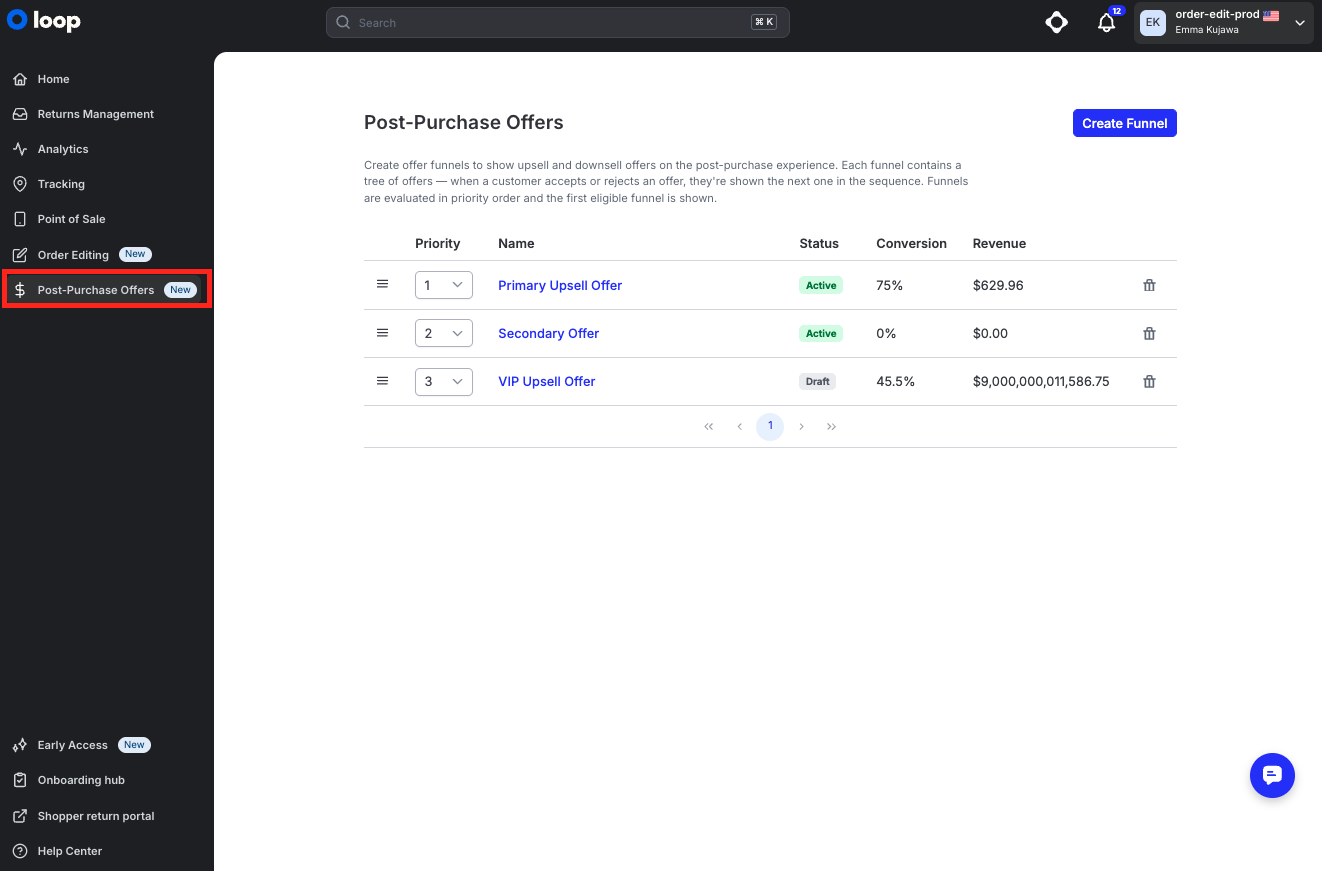
Funnels are managed from Post-Purchase Offers in the Loop admin left navigation.
Why it matters
Post-purchase is one of the highest-converting moments in the shopper journey — the customer has already committed to buying and their payment details are already entered. Presenting a targeted, time-limited offer at this moment can meaningfully increase average order value without any added friction at checkout.
Increase revenue per order with upsell and downsell sequences
Offer discounts only to shoppers who are most likely to accept, reducing margin loss
Use audience targeting via Workflows to control exactly who sees each funnel
Track real-time conversion rates and revenue per funnel directly in the admin
How it works
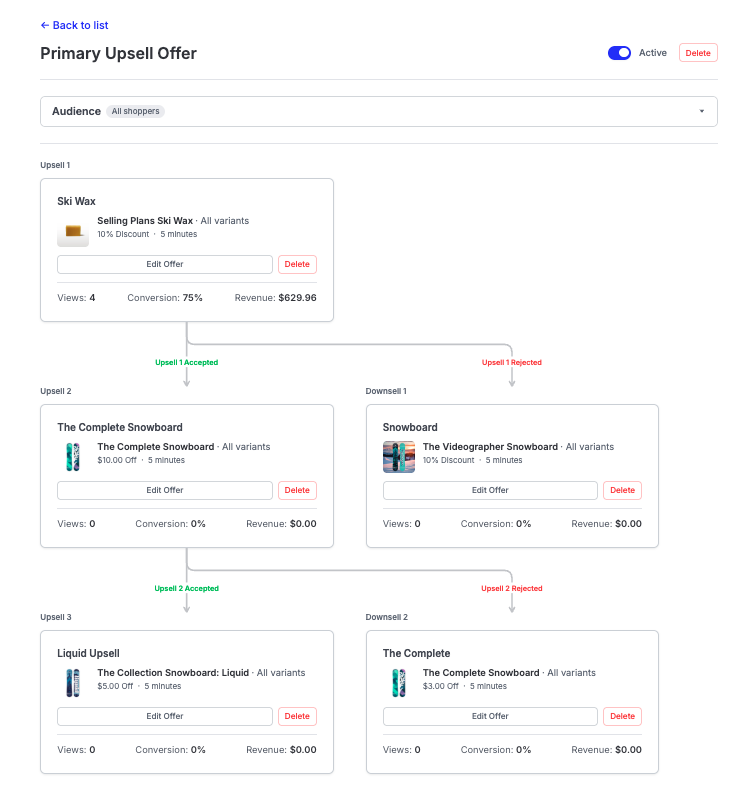
Post-Purchase Offers uses a funnel structure. Each funnel has up to five offer slots arranged in a branching sequence:
Upsell 1 is shown first to all shoppers in the audience
If the shopper accepts Upsell 1, they are shown Upsell 2
If the shopper rejects Upsell 1, they are shown Downsell 1
If the shopper accepts Upsell 2, they are shown Upsell 3
If the shopper rejects Upsell 2, they are shown Downsell 2
Each offer slot can be left empty or filled with a product, discount, and time window. Empty slots are skipped automatically.
Each individual offer includes:
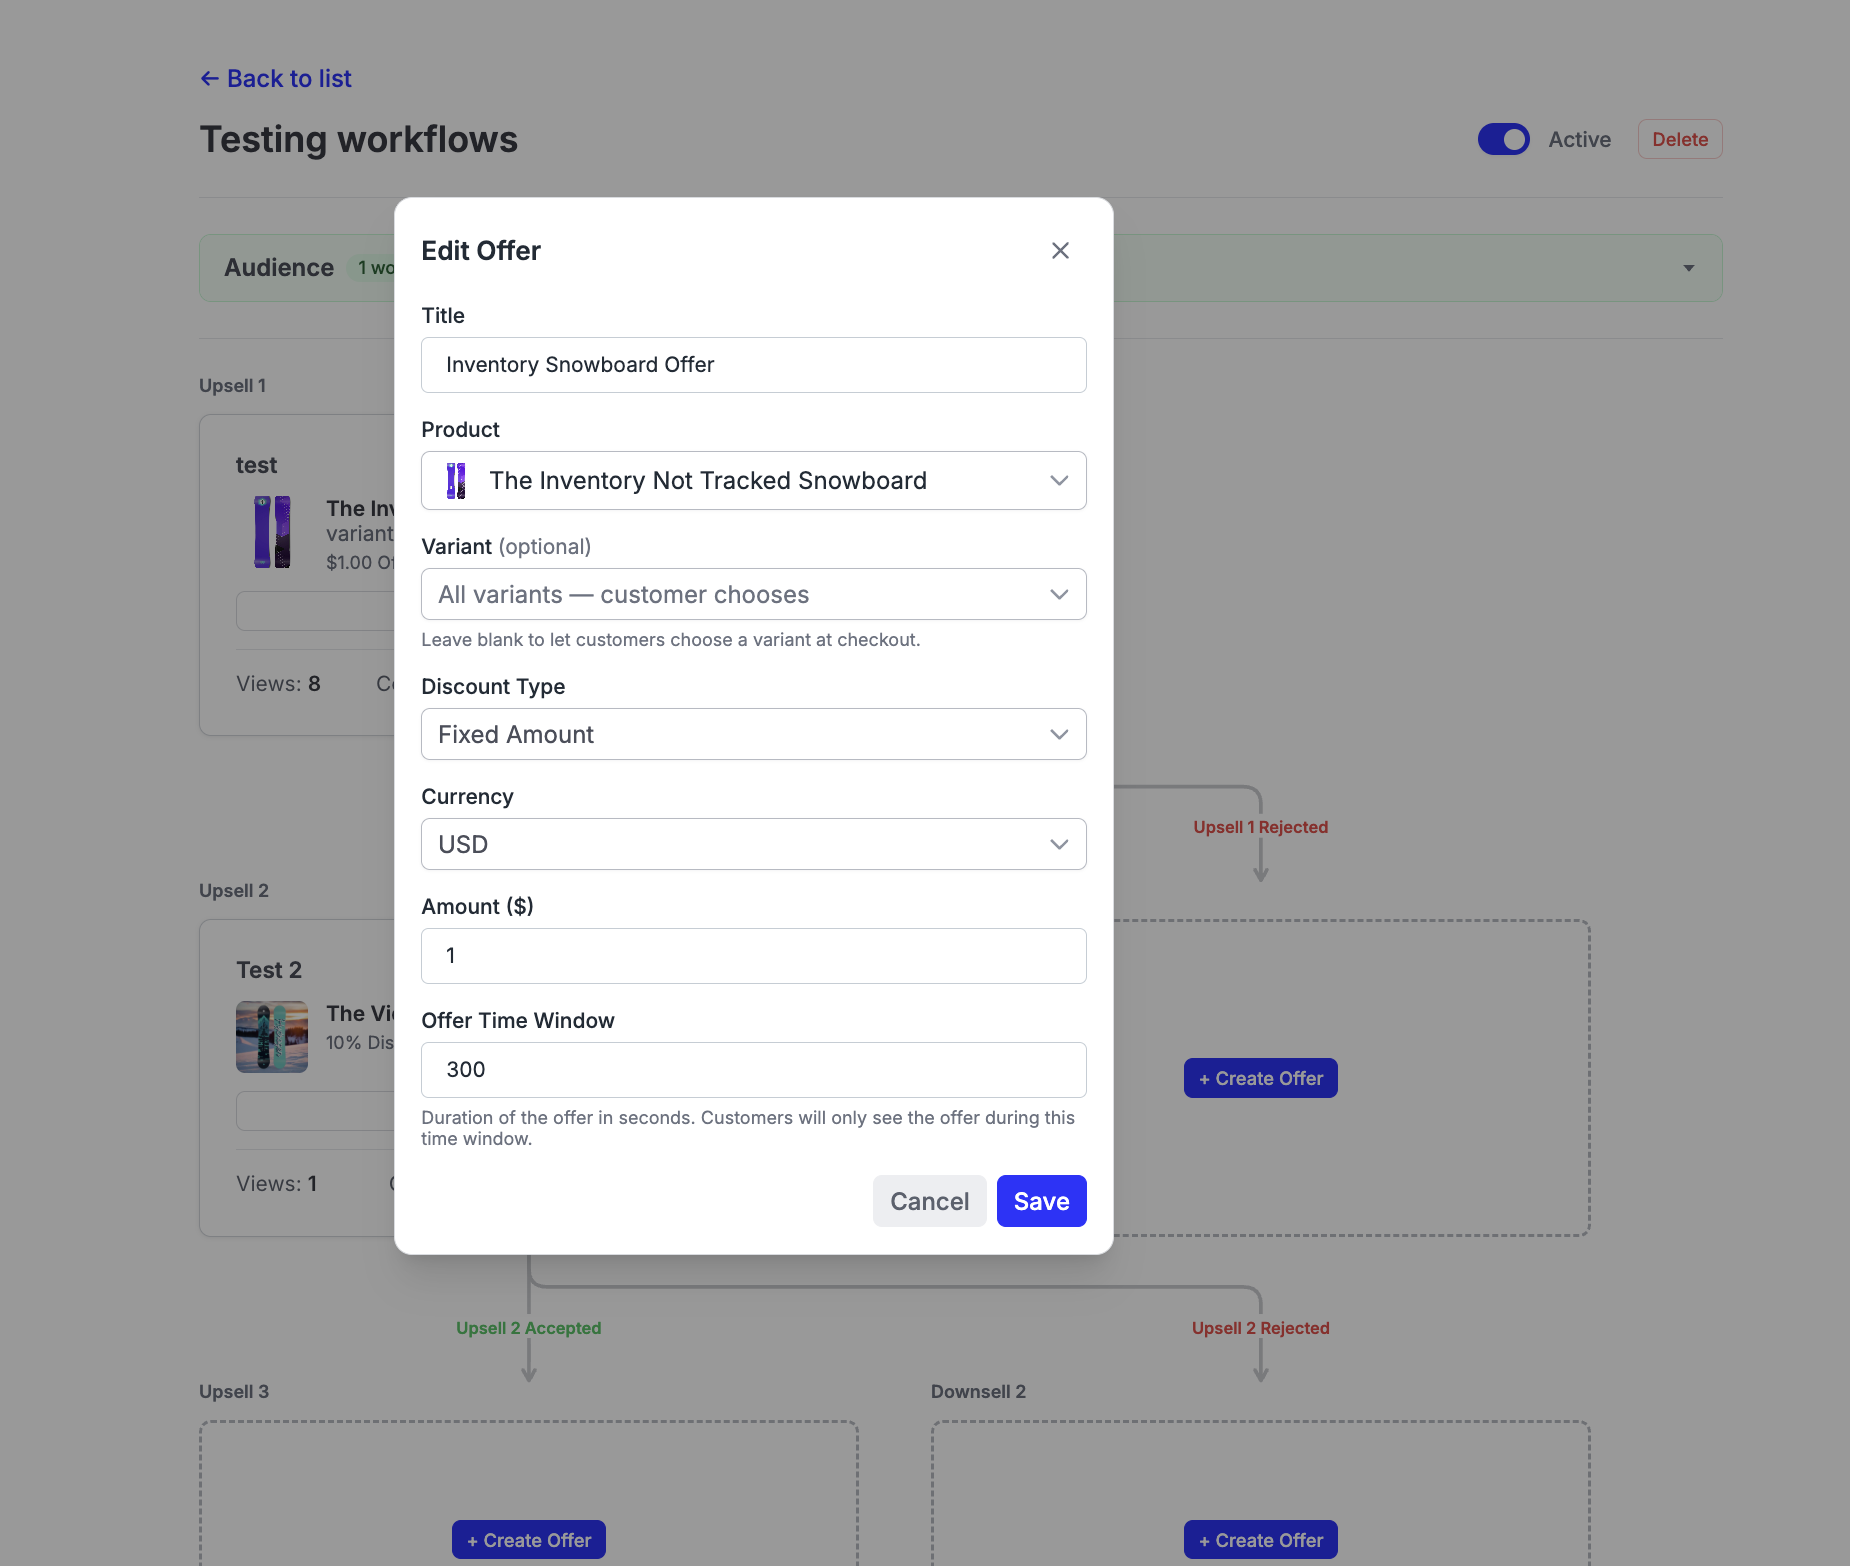
Product — the item being offered, pulled from your Shopify catalog
Variant — optionally pre-select a specific variant, or leave blank to let the shopper choose at checkout
Discount Type — percentage off or fixed dollar amount off
Offer Time Window — how long (in seconds) the offer is shown before it expires; default is 300 seconds (5 minutes)
Note: Each funnel has a Priority ranking. When multiple funnels are active, the priority order determines which funnel a shopper sees first if they qualify for more than one.
Setup
Step One: Loop Admin Funnel Creation
Follow the steps below to set up a Post-Purchase Offers funnel:
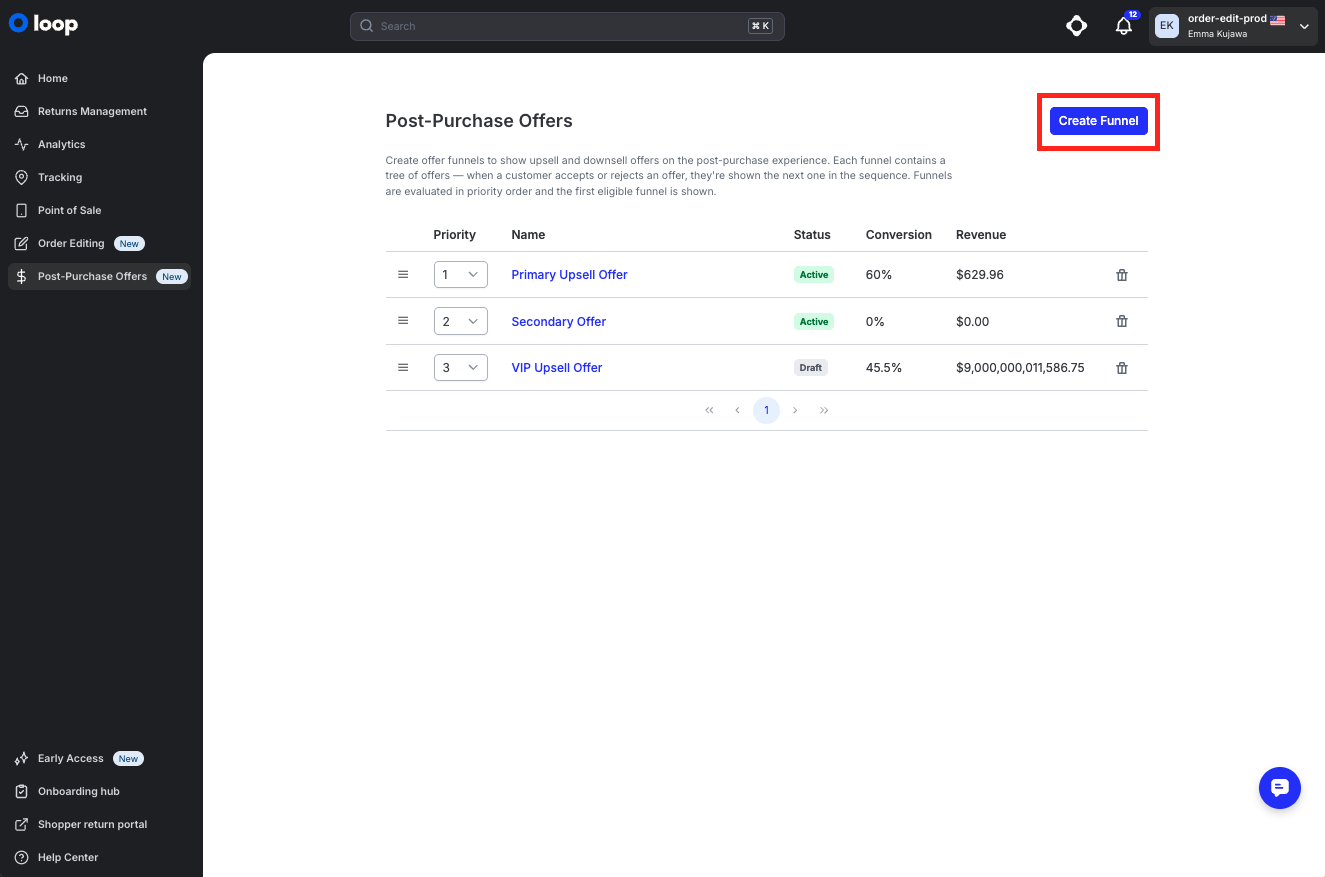
Navigate to Post-Purchase Offers in the Loop admin left navigation.
Click Create Funnel. Enter a name for your funnel and click Save.
On the funnel detail page, review the Audience section. By default, the funnel will show to all shoppers. To restrict the funnel to a specific audience, click Setup Workflow and configure your targeting rules.
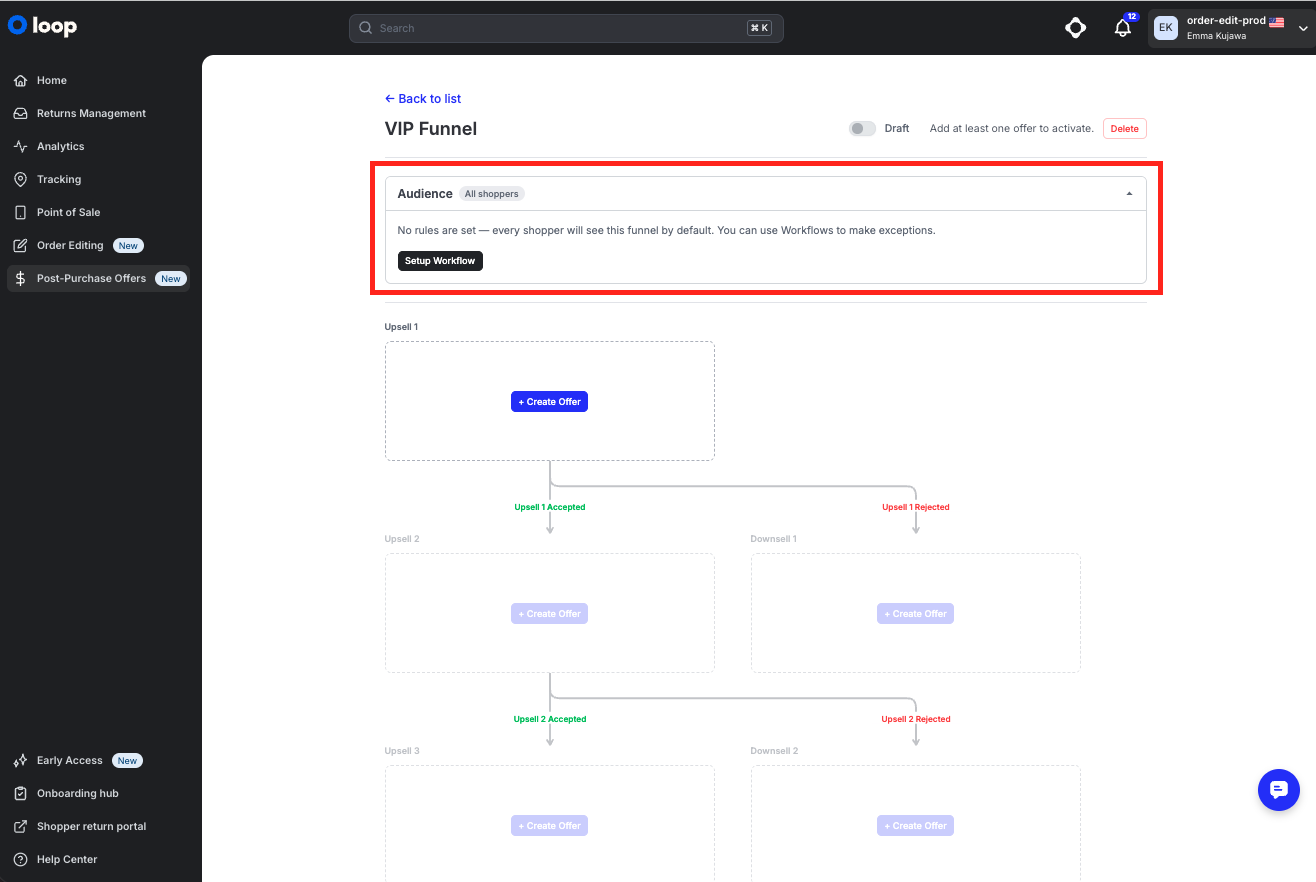
Tip: Use Workflows to target funnels based on total order value, order date, and product ID — so the right offer reaches the right shopper.
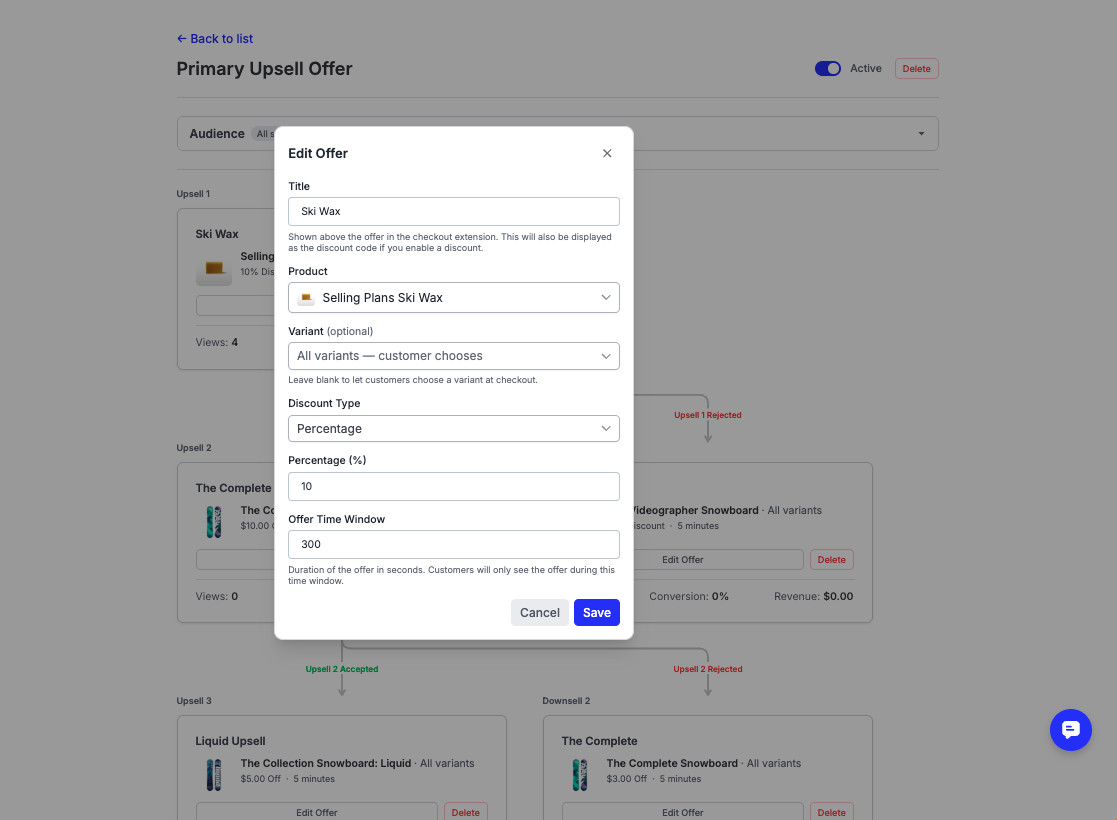
Under Upsell 1, click + Create Offer to configure your first offer. Fill in the following fields:
Product — search and select the product to offer
Variant — select a specific variant, or leave blank to let shoppers choose
Discount Type — choose Percentage or Fixed Amount
Discount Value — enter the discount amount
Offer Time Window — set the number of seconds the offer will be visible (default: 300)
Click Save when done.
Repeat step 4 for any additional offer slots in your funnel (Upsell 2, Downsell 1, Upsell 3, Downsell 2). You don't need to fill all five slots — empty ones are skipped automatically.
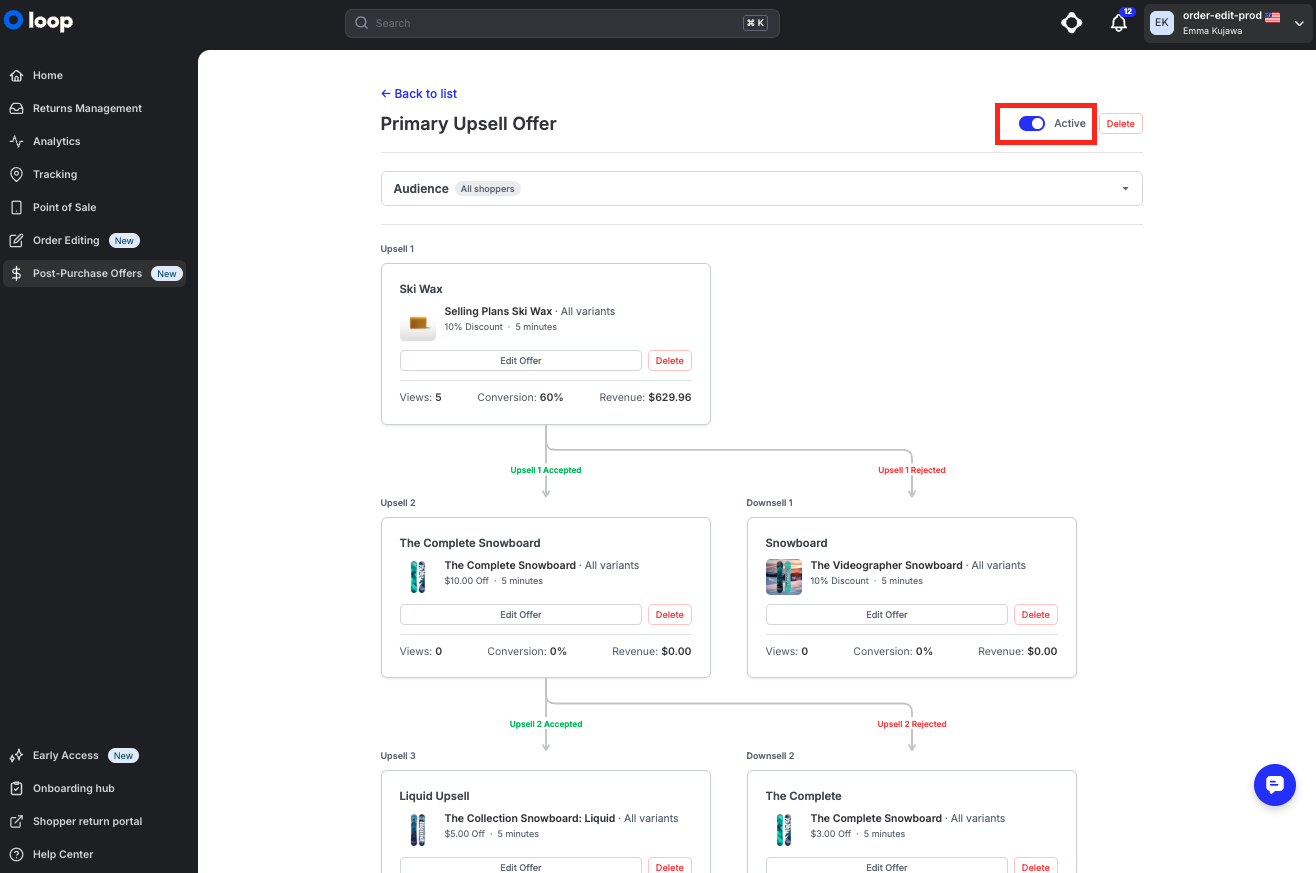
When your funnel is ready, toggle the status to Active.
Important: Funnels in Draft status are not shown to shoppers. Make sure to activate the funnel once setup is complete.
Step Two: Setup post-purchase page in Shopify
Navigate to Settings > Checkout > scroll down to Post-purchase page
Toggle on Loop Returns & Exchanges
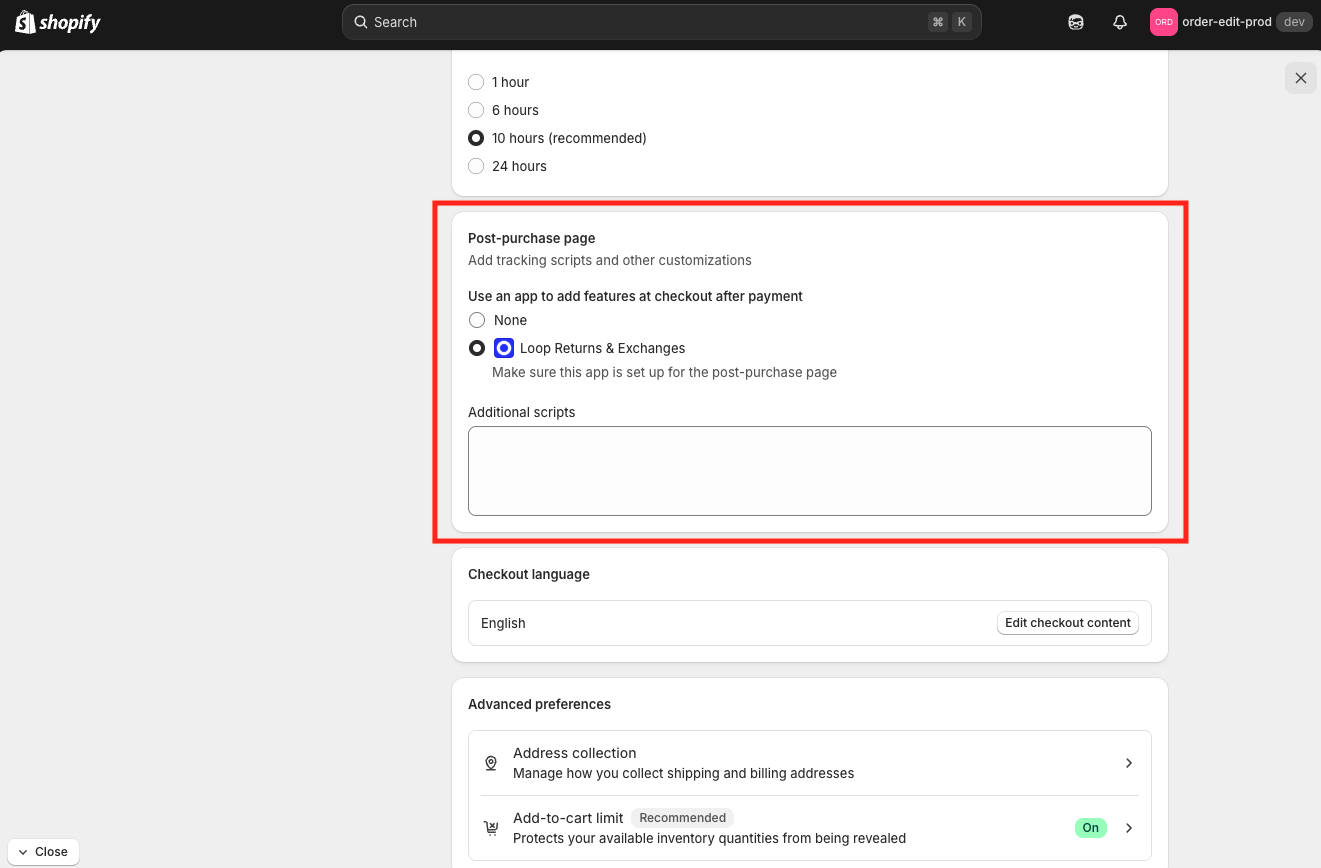
Click Save
Important: Once you save this page your post-purchase offer will be live.
Admin and portal experience
Funnel list view
The Post-Purchase Offers home page shows all your funnels with the following columns:
Priority — the order in which funnels are evaluated; use the dropdown to reorder
Name — the internal name of the funnel
Status — Active or Draft
Conversion — the percentage of shoppers who accepted at least one offer in this funnel
Revenue — total revenue generated from accepted offers in this funnel

Funnel detail view
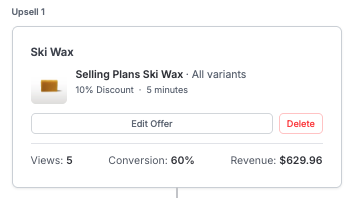
Inside each funnel, each offer card shows its individual performance metrics:
Views — how many shoppers saw this specific offer
Conversion — what percentage of viewers accepted the offer
Revenue — revenue attributed to accepted offers at this position in the funnel
Shopper experience
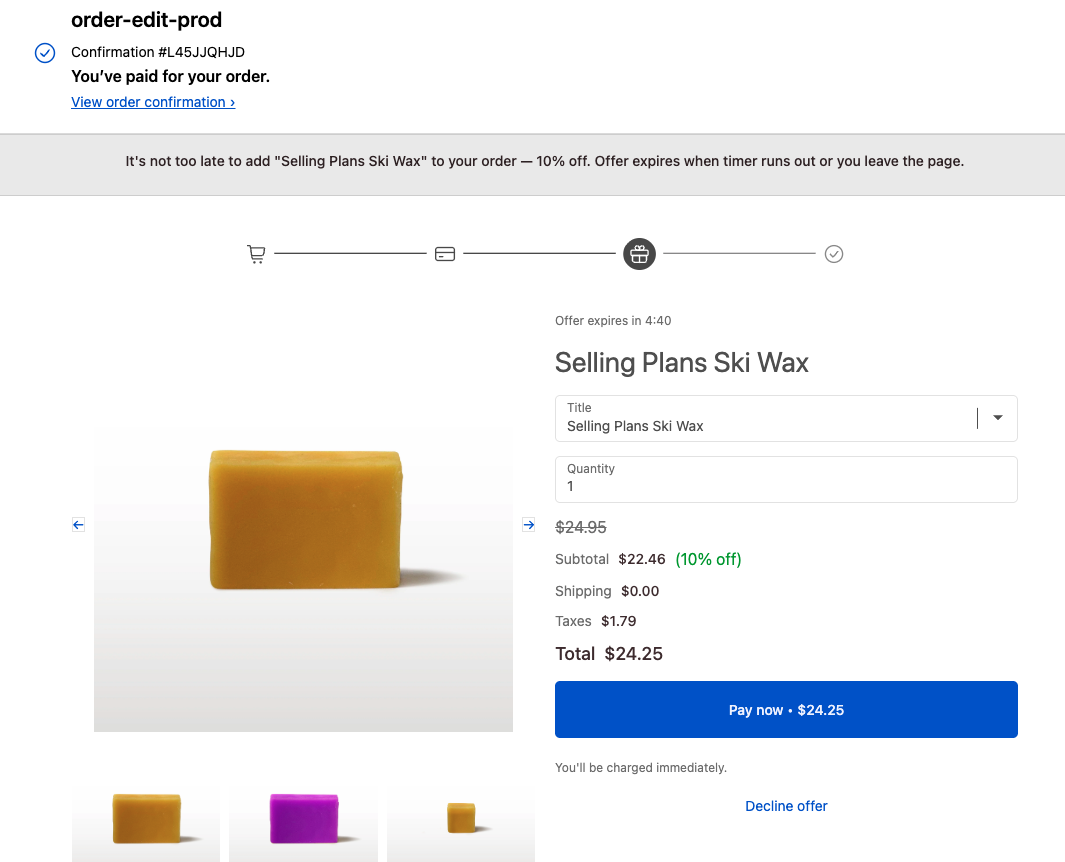
Shoppers see the offer immediately after completing checkout, on the post-purchase page. The offer displays the product, discount, and a countdown timer. Shoppers can accept or decline — accepting adds the discounted item to their order and moves them to the next offer in the sequence.
FAQ
How many funnels can I create? There is no limit on the number of funnels you can create. Use Priority to control which funnel is shown when a shopper qualifies for more than one.
Can I control which shoppers see a funnel? Yes. By default, a funnel is shown to all shoppers. Click Setup Workflow in the Audience section to restrict the funnel to specific segments — such as shoppers with orders over a certain value, or orders containing specific products.
What happens if a shopper doesn't accept or decline within the time window? The offer expires after the set time window (default 5 minutes) and the shopper moves on without any offer being added to their order.
Can I pre-select a variant for the shopper? Yes. In the offer configuration, use the Variant field to pre-select a specific variant. If you leave it blank, the shopper will choose their variant at checkout when they accept the offer.
Does the discount apply as a code or automatically? The discount is applied automatically when the shopper accepts the offer — they do not need to enter a code manually.
What's the difference between an upsell and a downsell? Upsells are shown when a shopper accepts the previous offer — they represent an opportunity to stack additional value. Downsells are shown when a shopper declines — they're typically a smaller or lower-commitment offer as a softer alternative.
Can I have a funnel with only one offer? Yes. You can fill only the Upsell 1 slot and leave the remaining slots empty. The funnel will show just that single offer.
If a merchant is also using Order Editing, are there any considerations to be aware of? Post-Purchase Offers (PPO) and Order Editing (OE) work well together. If you're using Shopify Flows to hold orders with OE, you'll need to do is setup a third Flow to ensure the order hold occurs after the PPO is complete.
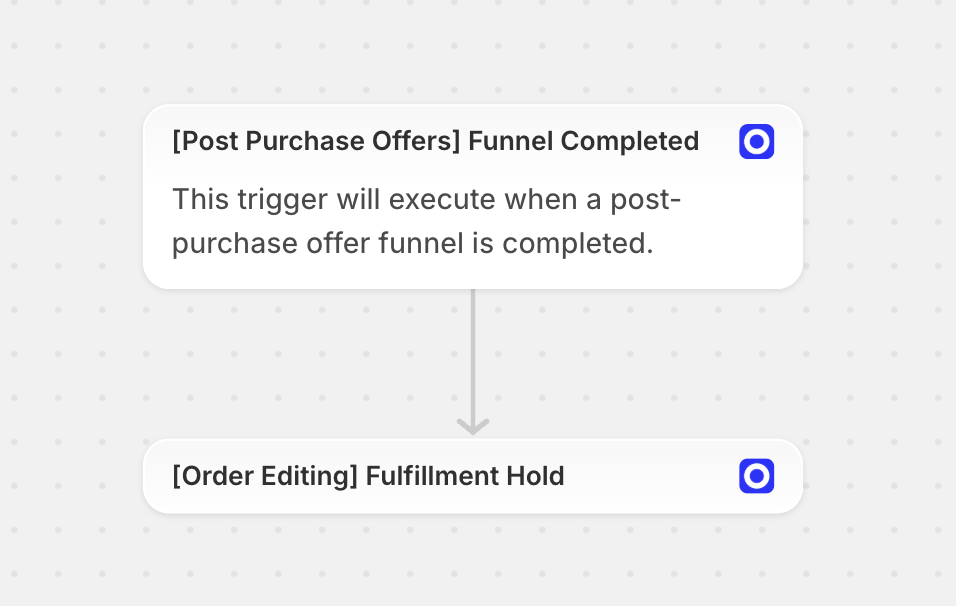
Note: The timer set in Order Editing includes the time the shopper spends on the Post-Purchase Offer.
For example:
Merchant sets the OE timer to 40 minutes
Merchant sets the PPO timer to 10 minutes
Shopper takes 10 minutes on the PPO offer
30 minutes remain on the OE timer
Please reach out to support@loopreturns.com with any additional questions.