
Pre-Printed Label Tracking
OVERVIEW
This article explains how merchants can set up tracking for pre-printed labels, as well as the merchant and customer experience of pre-printed label flows.
Use the menu on the left to quickly navigate this article
Important: Pre-printed label tracking must be facilitated through EasyPost. This functionality does not work through any other shipping services at this time. Please contact support@loopreturns.com or your Merchant Success Manager if you have questions on this.
What are pre-printed labels?
Pre-printed labels are return shipping labels mailed out with products to simplify the return experience for the customer. When a customer wishes to initiate a return, they will access Loop and note whether or not they still have their pre-printed label. If they have their label, Loop will use the tracking number associated with that label to track the return’s processing events. Pre-printed label functionality is included on all Loop plans, but must be used in conjunction with an EasyPost account.
Setup
Pre-printed label tracking is not a recommended setup, but can be implemented based on Merchant needs.
Pre-printed labels can be added to Loop manually or automatically based on Merchant needs and technical capabilities.
Merchant must have an EasyPost account set up to leverage pre-printed label tracking with Loop.
Note: Tracking support for prepaid labels can vary case by case, depending on whether the merchant's carriers are added to their EasyPost (EP) account. EP generally doesn't have carrier restrictions, so - as long as the carrier is in the merchant's EP account - Loop will be able to track returns with prepaid labels.
Manual pre-printed label tracking
To set up manual tracking for pre-printed labels:
Create and connect an EasyPost account to your Loop admin following these instructions.
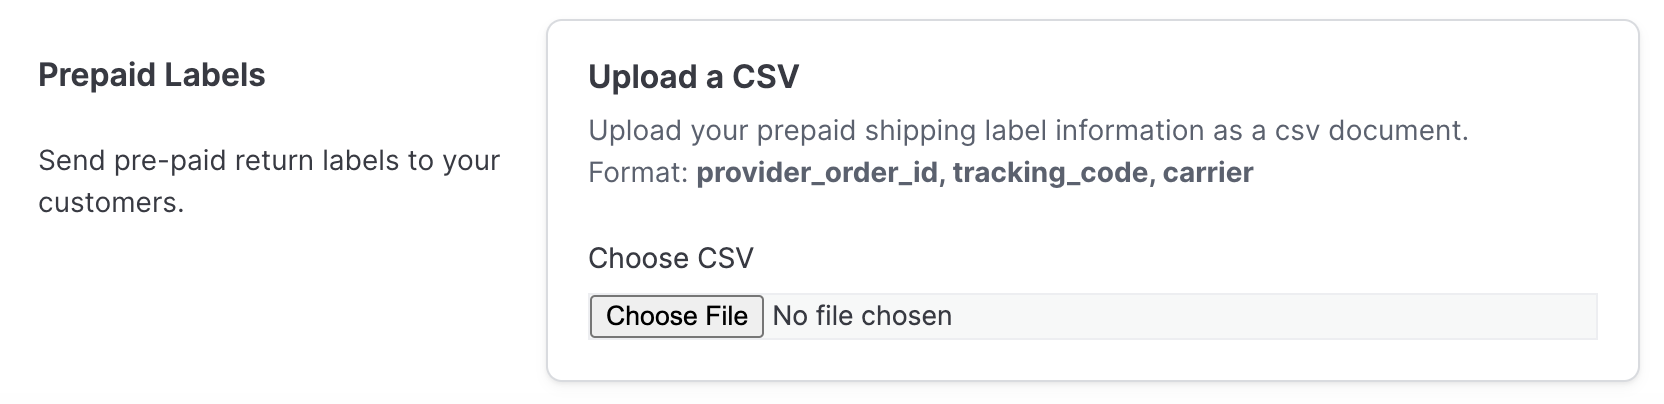
Create a CSV file (example format). The file should include the following:
Shopify Order ID
Note: The Order ID is the ID number at the end of the order detail URL. For example: https://standardwear.myshopify.com/admin/orders/903377813588
Carrier Tracking Code
Carrier Tracking String
Important: The Carrier Tracking String must have the correct formatting, which merchants can double-check in EP’s API documentation.
Upload the CSV file to the Loop admin by way of the PrePaid Labels field in Shipping > Shipping services.
Note: Merchants manually implementing Pre-Printed Label Tracking will repeat steps 2 and 3 in regular intervals (1-3 business days).
Automated pre-printed label tracking
Important: To use automated pre-printed label tracking, merchants must ensure that their EasyPost account is connected to Loop. See EasyPost Shipping Labels for instructions on how to integrate EasyPost and Loop.
To set up automatic tracking for pre-printed labels:
If EasyPost isn't already connected to Loop, add the merchant's EasyPost account to Loop.
Ensure pre-printed labels are enabled in Shopify.
Using the Shopify GraphQL Admin API, use the
metafieldsSetmutation to add a tracking number and carrier to a specific order. As an example, see the mutation and variables below.mutation AddTrackingInfoToOrder( $orderId: ID! $namespace: String! $trackingNumber: String! $carrier: String! ) { metafieldsSet(metafields: [ { namespace: $namespace, key: "_tracking_number", type: "single_line_text_field", value: $trackingNumber ownerId: $orderId }, { namespace: $namespace, key: "_carrier", type: "single_line_text_field", value: $carrier ownerId: $orderId } ]) { metafields { id key value } userErrors { field message } } }Variables:
$namespace: This can be set to any string value to help organize metafields.
$trackingnumber: The order's tracking number.
$carrier: The order's carrier.
$orderId: The order's Shopify ID.
For details, see Shopify's metafieldsSet documentation.
Note: Once this setup is completed, Loop will read this metadata when a customer looks up the order and will associate that tracking number and pre-printed label with the order unless the customer requests to generate a new label.
Customer experience
Your customers will go through the following flow:
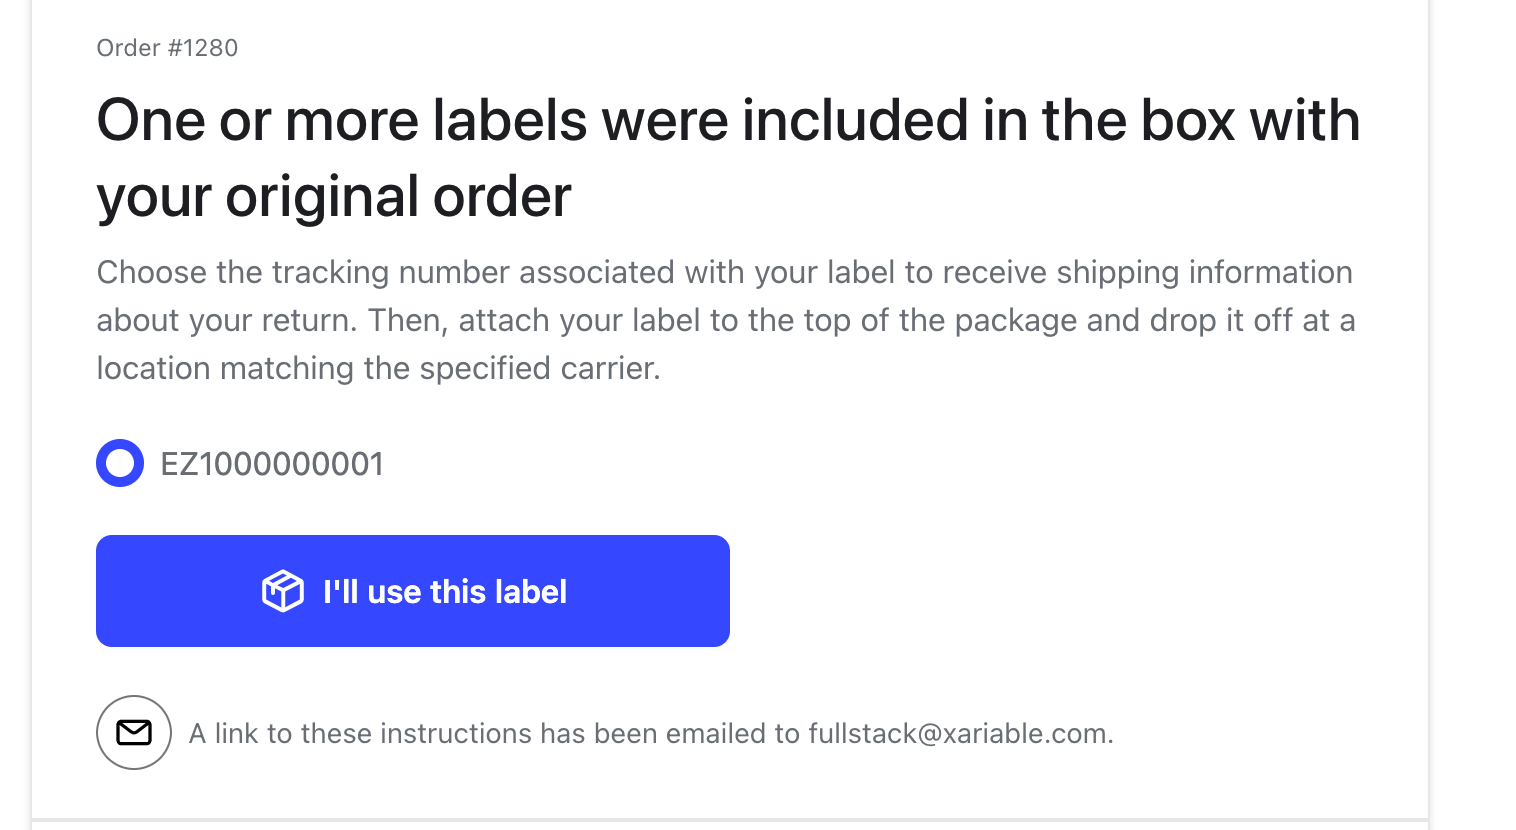
The customer receives the shipping label in a box including instructions to access the merchant’s Loop portal to request a return.
The customer follows the normal Loop return request flow.
The customer sees messaging explaining that a pre-printed label was included in their box.
The customer has two options:
Option 1: "CONFIRM YOU HAVE LABEL"
Messaging will appear stating “Done!”
Loop will track processing events based on the pre-printed label.
Option 2: "I don’t have the pre-paid label"
The customer will be sent the return confirmation page, which provides a button that allows them to download their return label.
The return label will be submitted by way of the return confirmation email.
Loop will track processing events based on the EP label.
Notes:
If a customer clicks “CONFIRM YOU HAVE LABEL” but later requests a new label, the merchant's customer experience team can generate an EP label by clicking “Generate New Label” from the Return Details in Loop. They can then email this label to the customer by clicking “Email Shipping Label.”
If a customer clicks “I don’t have the pre-paid label” and submits the return with their Pre-printed label, Loop will not be able to track the return and the return will need to be manually processed.
If an order does not have a Pre-printed label associated with it, the customer’s return experience will not include the Pre-printed label messaging and an EP label will generate automatically.
Please contact support@loopreturns.com with any additional questions.