
Workflows
OVERVIEW
This article explains how to use Workflows to create and manage return rules for scenarios outside typical return policies. It covers creating workflows using predefined templates, configuring conditions, setting up customer input components, and applying various actions.
Use the menu on the left to quickly navigate this article.
Tip: For tips on using Workflows, review this list of common use cases.
Important: Due to the complexity of Workflows, Loop recommends publishing and immediately testing a few return scenarios to ensure your desired behaviors are met. We have super handy Help Center articles on both building a test order in Shopify and testing your Loop instance for your convenience to assist you.
What it is
Workflows is a Loop feature merchants can use to create and manage return rules. The various workflows merchants can create are intended to accommodate scenarios falling outside of a typical return policy.
Setup
Location and general functionality
In the Loop admin, go to Returns management > Policy settings > Workflows. There, merchants can access the list view with all existing workflows.
Merchants can also filter the view to show only draft or only active workflows.
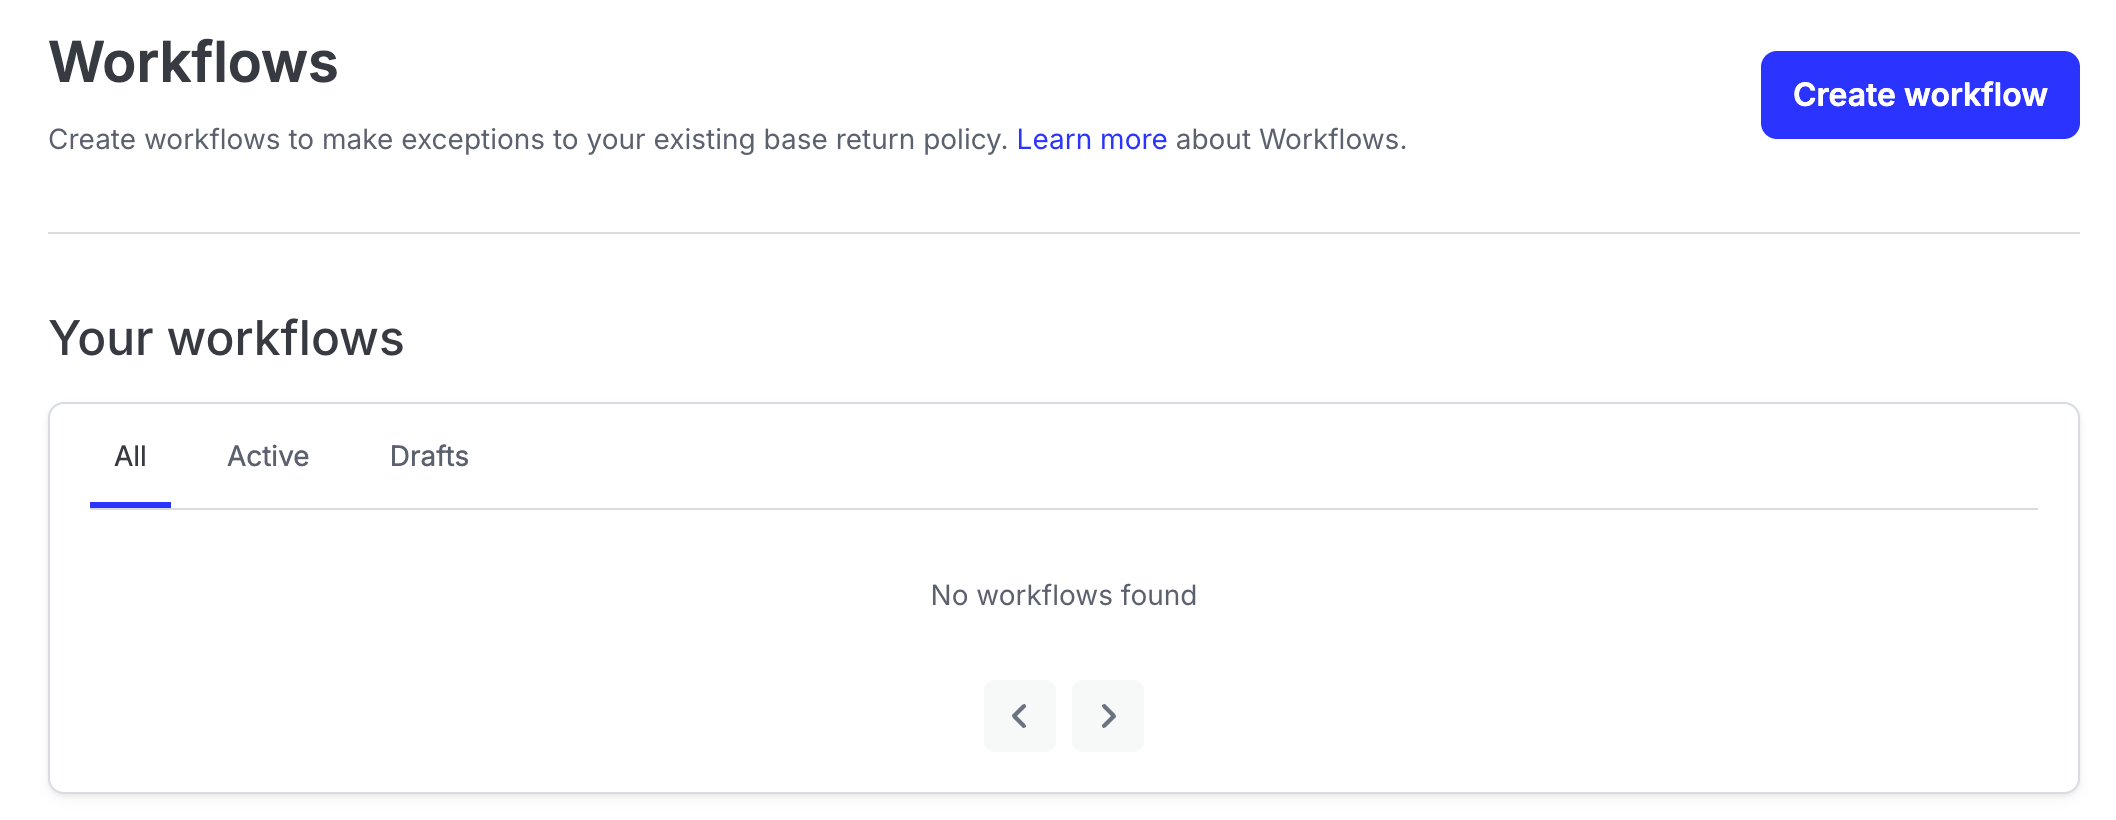
Selecting the trash icon will delete a workflow. Workflows must be unpublished/in 'Draft' status to be deleted.
Merchants can prioritize workflows using the priority elements in the far left column. Drag and drop each element by clicking, holding, and dragging the dotted icon to the desired location in the workflow order, or simply select a number from the dropdown to arrange the priority of the workflow elements.
Note: Workflow priority is only relevant in scenarios in which a return qualifies for two of the same action type. For example: In the case where two workflows that dictate a handling fee are triggered, Loop will assess the fee present in the workflow with the highest priority.
The only condition that is stackable via multiple workflows is the "exclude outcomes" action. This means that multiple Workflows with the "exclude outcome" actions can stack with each other to exclude extra outcomes.
Creating a new workflow
Video Instructions
View how to create a new workflow in the video below.
Written Instructions
To create a new workflow:
In the Loop admin, go to Returns management > Policy settings > Workflows.
Select the Create workflow button in the top right corner of the page.
If using the Order Editing feature, select which feature you are setting up the Workflow for. Merchants without Order Editing on will not see this choice.

Select from the following predefined Workflows types:
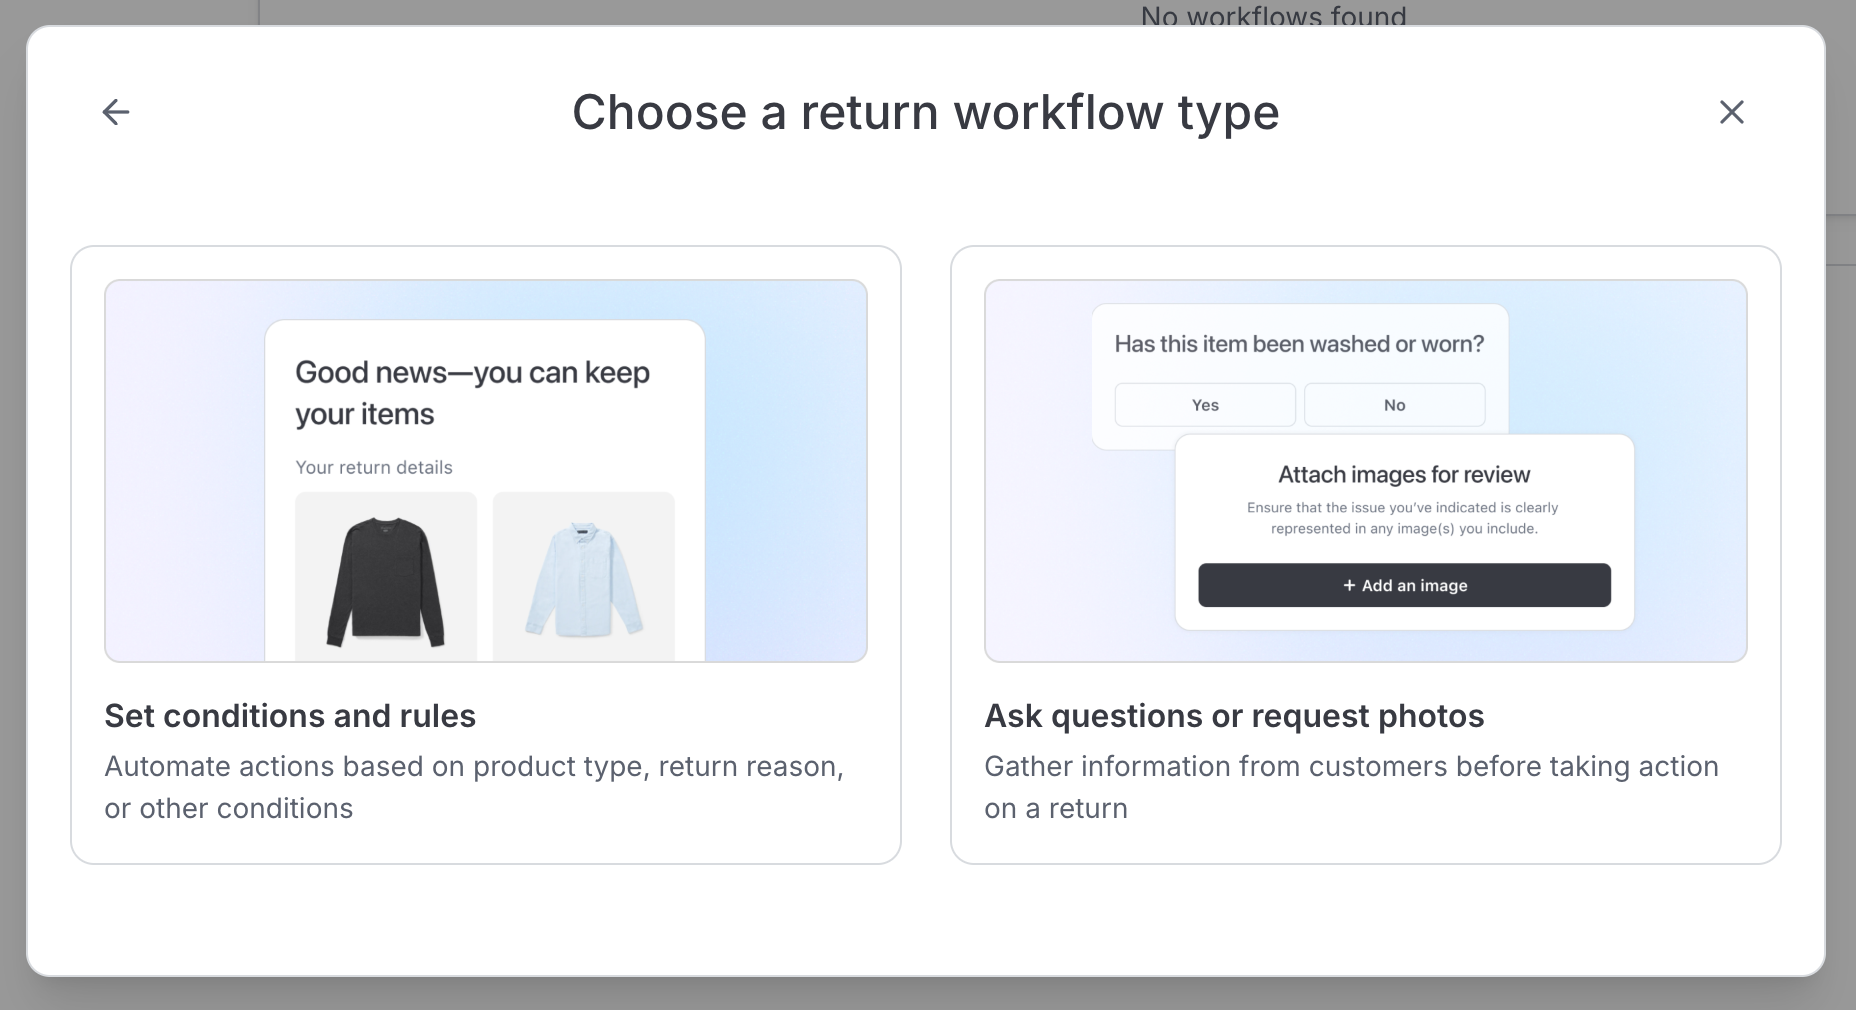
Ask questions or request photos - Ask the customer a question, if the customer selects 'yes' the action will trigger. Alternatively, request that the customer submit an image of the product they're returning.
Set conditions and rules - Trigger an action based on an event and condition.
Once merchants have selected a workflow type, they can configure each component of the workflow. Depending on the type selected, this may include setting conditions, questions, and actions.
After configuration is finished, save and publish the workflow.

Tips: Below are some tips for configuring workflow components.
Clicking a component (Condition, Question, Outcome, Action, etc.) will open a modal to select the right condition or action for your use case. These can then be configured further in the side panel.
If the Workflow has incomplete components, you will see a red 'error' display
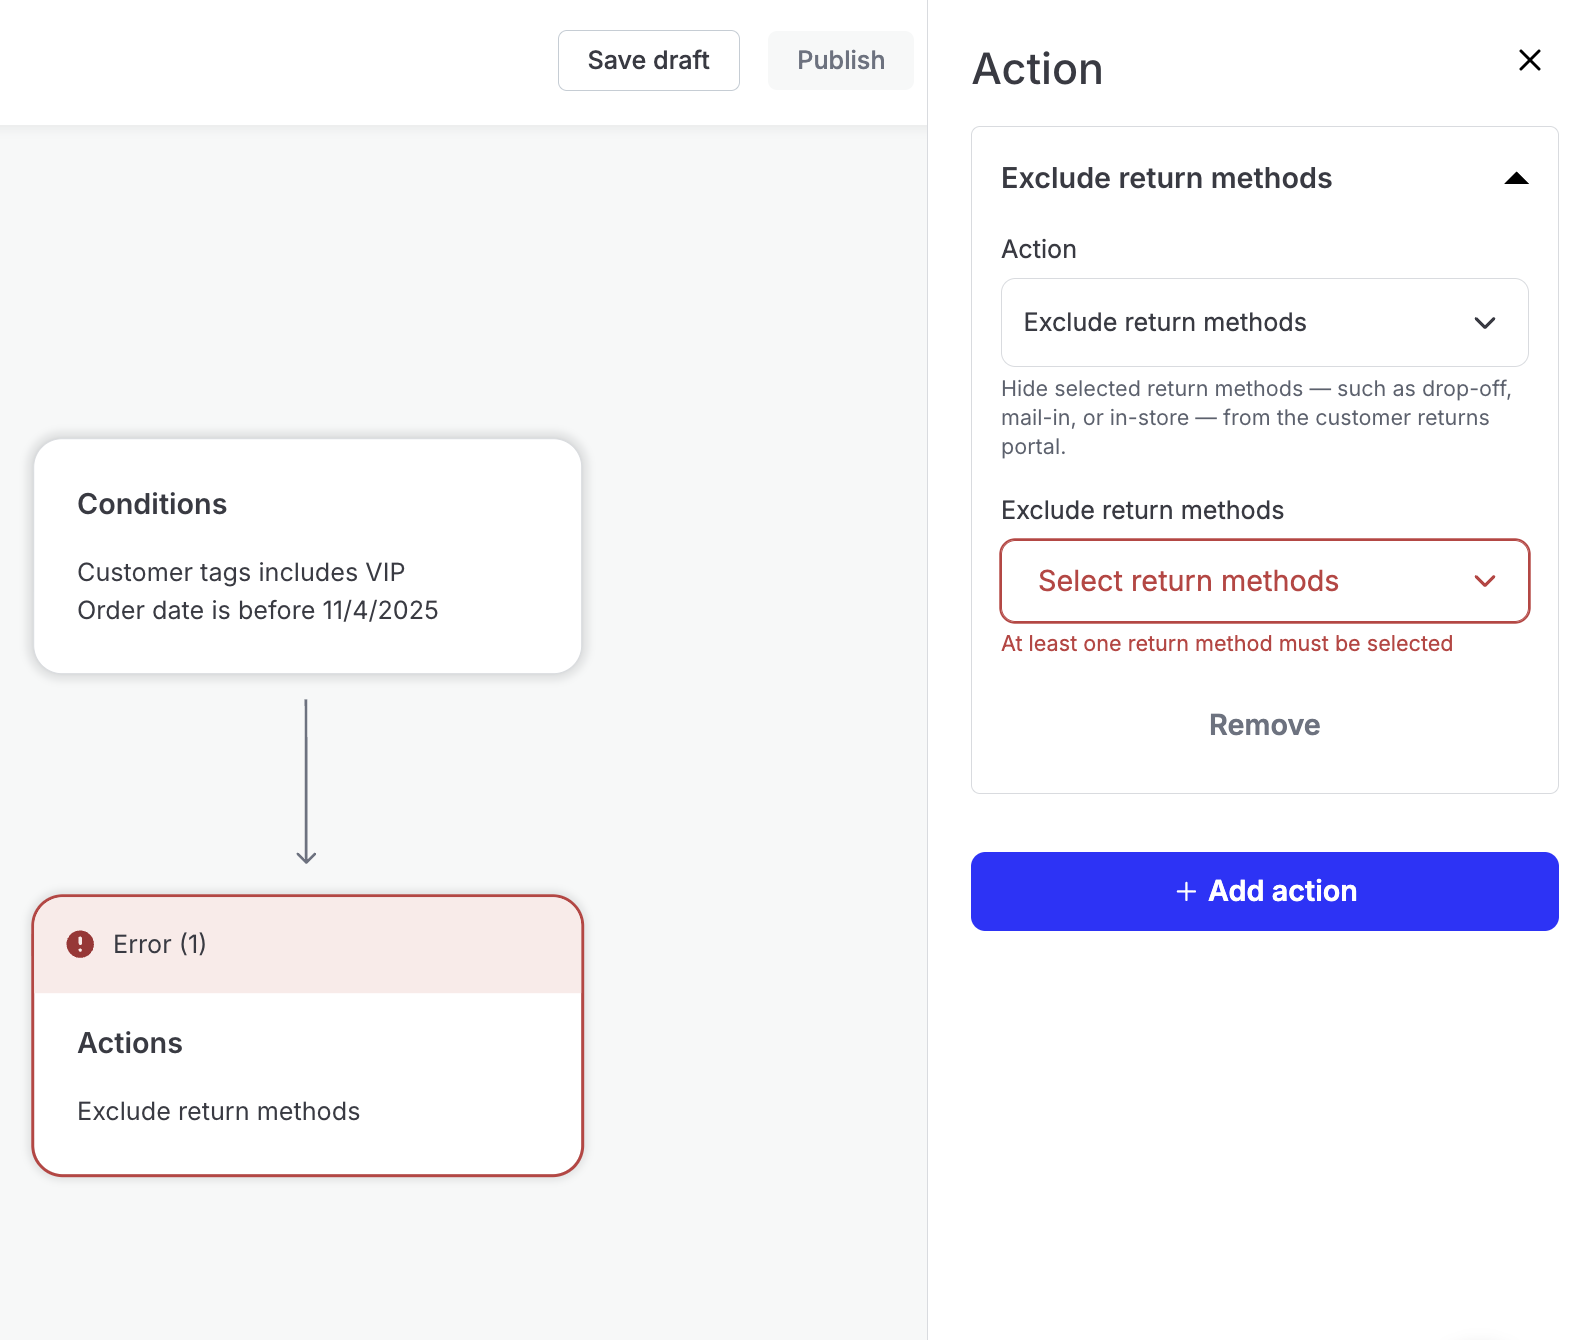
Workflows cannot be published until all components have been completed
Workflow types
As stated in this article's "Creating a new workflow" section, the two predefined Workflows types include:
Set conditions and rules - Determine an action based on a condition.
Ask questions or request photos - Ask the customer a question, if they select 'yes' that triggers an action. Alternatively, ask the customer to submit an image of the product they're returning.

Merchants must select one of these two types to begin and create a new workflow.
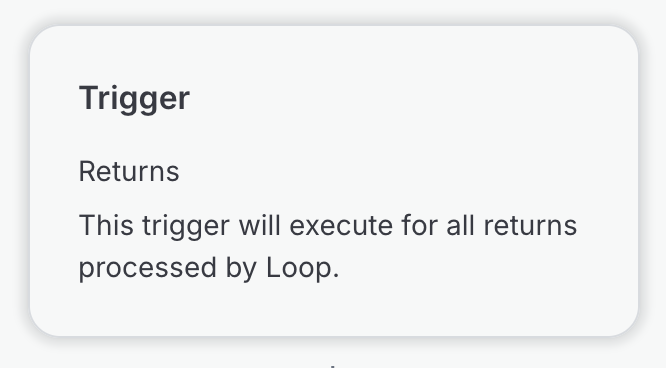
Trigger component
Note: This component currently comes pre-selected, and is based on the feature that the workflow is being built for. The two options today are: Returns, and Order Editing. In the future, this component will be configurable by merchants, and will include more granular trigger events.
The Trigger component determines when the workflow fires. The available Conditions and Actions depend on the trigger event and its timing. Merchants using Loop's Order Editing feature will have the option to set up workflows for that feature. All other merchants will see Returns pre-selected for them.
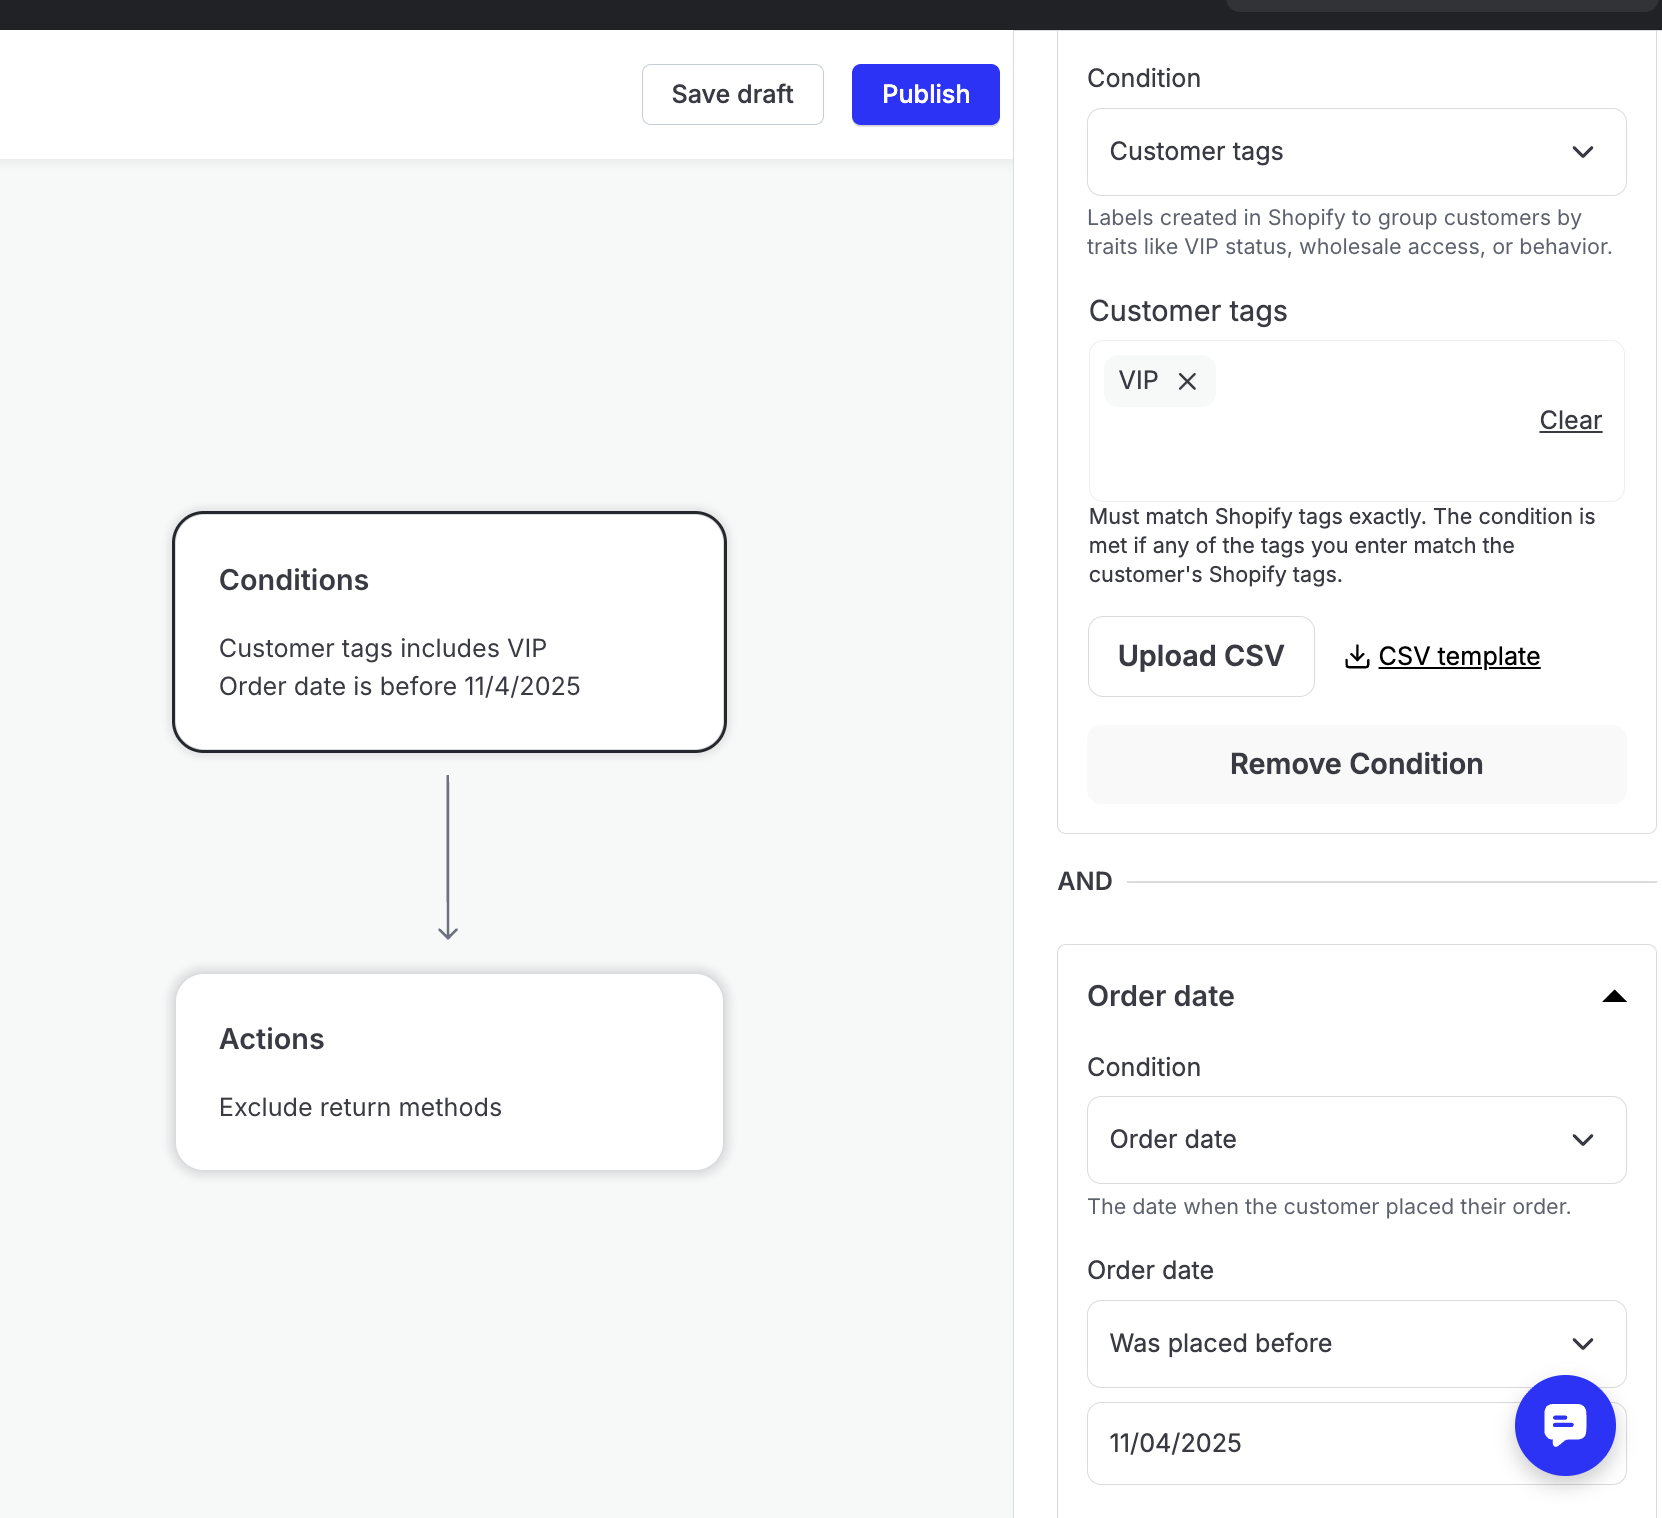
Conditions component
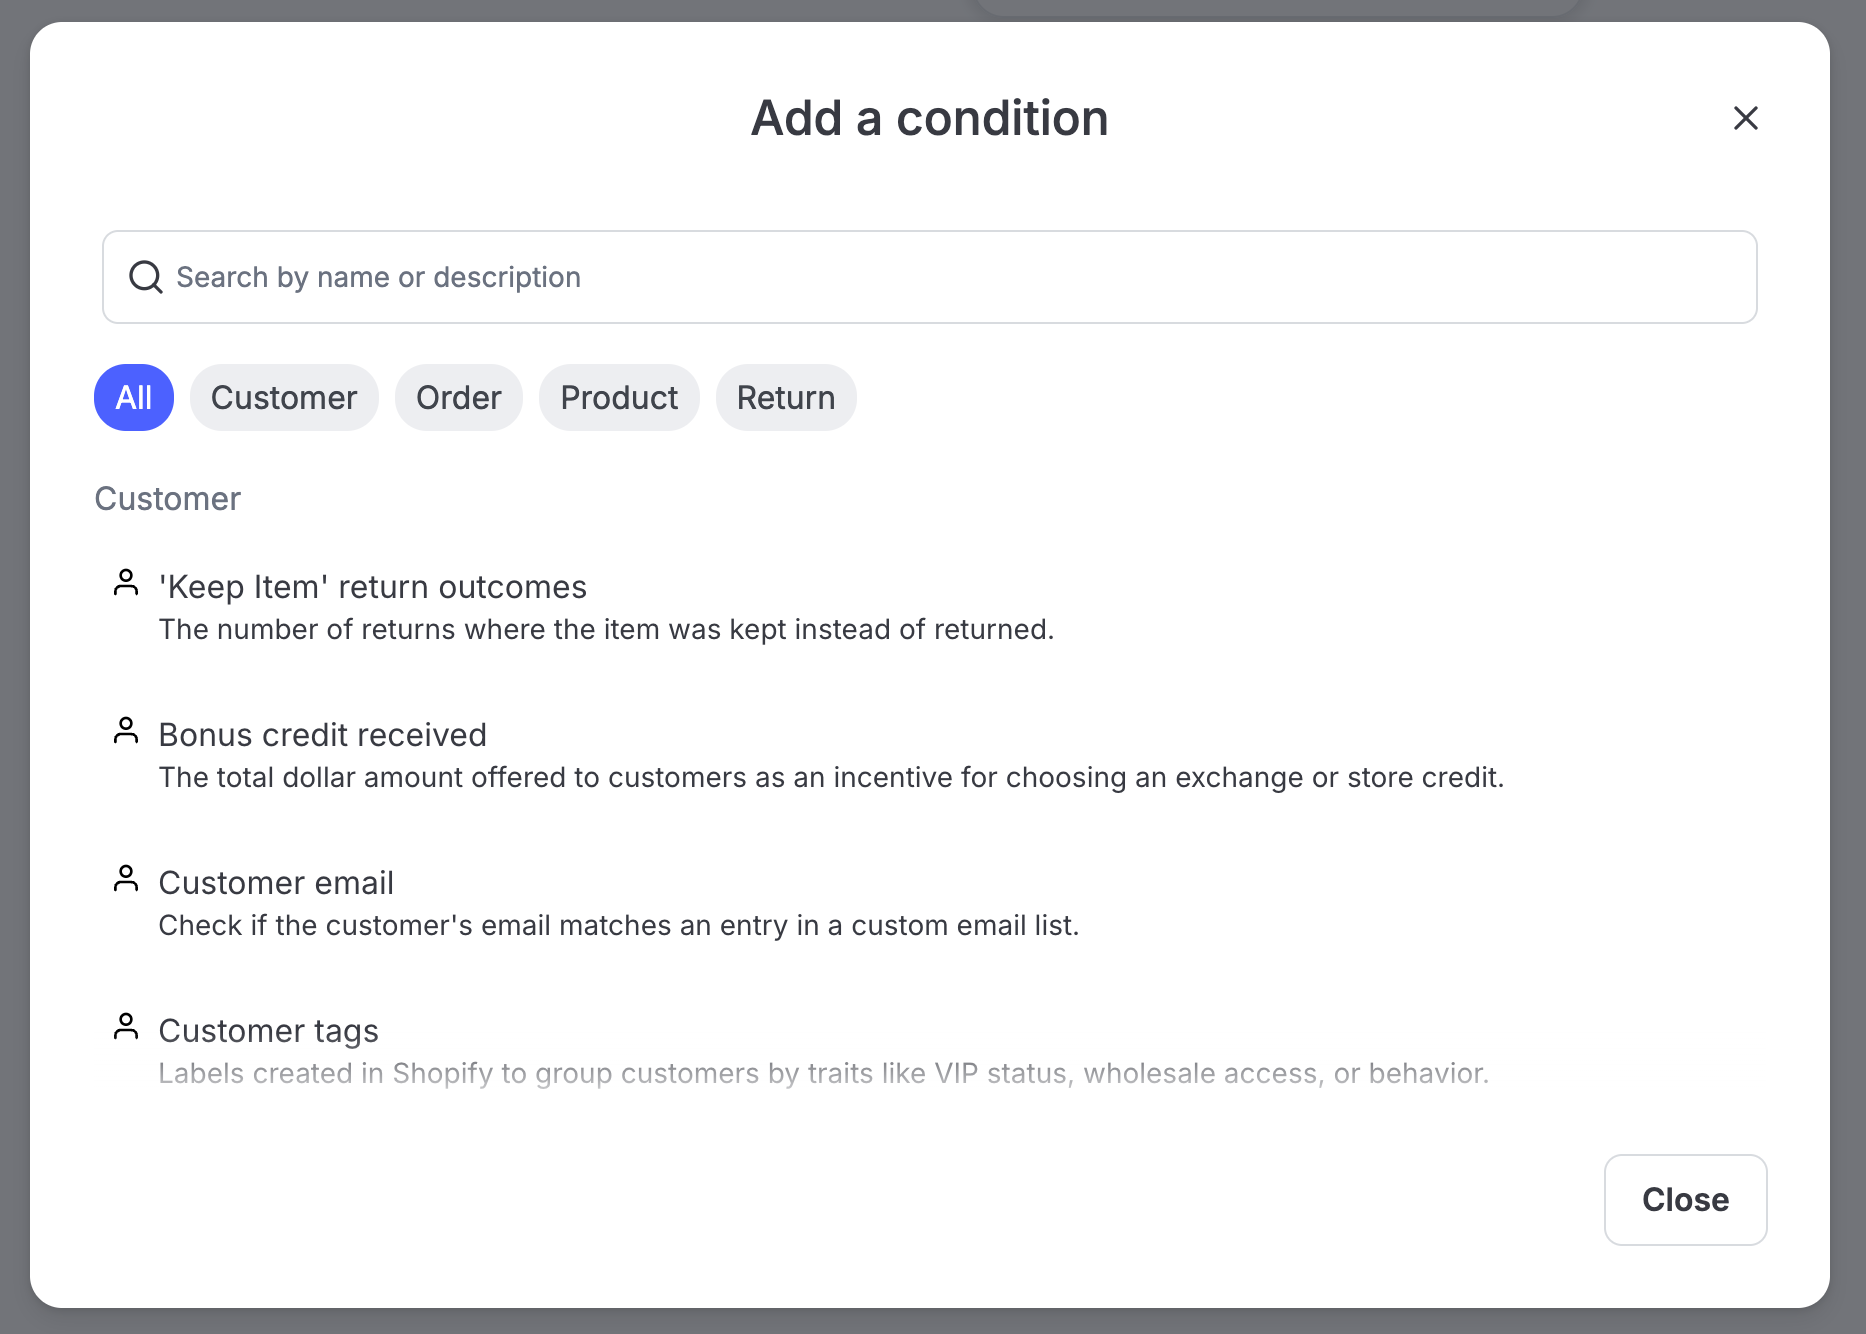
The Conditions component dictates qualification criteria for the workflow. The following condition categories are currently available:
Customer conditions - Customer conditions target a specific customer. Some examples include customer tag, number of orders, and return count.
Order conditions - Order conditions target an entire customer order. Some examples include order tag, order total value, fulfillment date, and order date.
Product conditions - Product conditions target a line item. Some examples include product return reason, product ID, product SKU, and product and variant level metafields. If manually entering line items, press the "enter" button on the keyboard after each line item to separate them. If uploading via CSV, the CSV file should have one column with each identifier (for example: SKU, tag, ID, etc.) in its own field going from top to bottom of the document.
Return conditions - Return conditions target the specific return. Some examples include return total value, return item count, and return outcome.
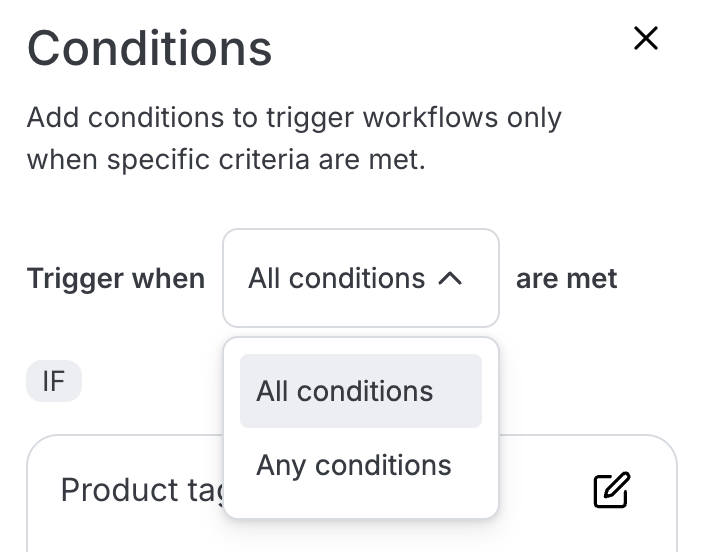
If needed, merchants can stack multiple conditions together to further narrow down which returns qualify for a given action.
To set multiple conditions, merchants can select between:
"True if ALL conditions are matched." This setting is an AND statement that will trigger the action when all conditions are met.
"True if ANY conditions are matched." This setting is an OR statement that will trigger the action when any of the chosen conditions are met.
Customer input components
Ask a yes/no question
The Question component allows merchants to configure a question to ask a customer if certain conditions are met. The question is a Yes/No question type in which a Yes response will trigger the intended action.
Note: The question condition is only available on the "Ask questions or request photos" type.
Question configuration options include:
The messaging for the question presented to the customer.
An optional checkbox to include a response if the customer selects Yes.
Image Upload
Merchants can also require a photo upload from customers if they wish. Check out Loop's Photo Upload article for more information.

Actions component
The Actions component allows you to configure an action for returns that have met all previous criteria. Just as conditions can be stacked, actions can be stacked as well so that there can be multiple actions taken based on the conditions configured.
The following actions are available:
Bypass final sale - Ignore a final sale designation on a product, and fall back to the base return policy
Donate - Send the returned items to the merchant's configured donation center
Exclude return outcomes - Select one or more return outcomes to exclude. Exclude all outcomes to make an item ineligible for return.
Exclude return methods - Exclude specific return method options (for example: Happy Returns drop-off).
Hide products in portal - Prevent a product on the order from showing up in Loop. This action is often used for non-returnable add-ons such as shipping insurance or customization line items. It must be paired with a Product condition.
Issue partial return credit - Offer customers the ability to accept a percentage of a product's return credit based on return reasons and Yes/No questions. Loop recommends only using this action within the 'Ask a question' template and pairing it with a Keep Item action.
Let customer keep item(s) - Allow the customer to avoid shipping costs by keeping the item.
Reject item - Permanently mark the item ineligible for return.
Require customer to ship return - Disable automatic label generation and display the merchant's destination address to the customer instead, requiring them to ship the return back on their own.
Refund original shipping cost to customer - When issuing a refund or store credit, include the cost of shipping paid by the customer on the original order.
Manual Review - Flag the order for manual review (this is best if the merchant's team needs to accept or reject the request before processing)
Set exchange delivery method - Set a shipping method for the merchant's outgoing exchange orders.
Set handling fee - Set a handling fee to override, add to, or waive existing fees.
Set return reason group - Modify the set of return reasons the customer can select from.
Set return processing event - Modify the return's processing event.
Set return window - Specify a return window that differs from the merchant's regular policy.
Set return destination - Select the destination where a return should go.
Set Shop Now bonus credit - Specify a dollar amount to be offered to the customer as bonus credit in the Shop Now flow.
Set Shop Now discount - Apply a percent discount to the Shop Now cart to automatically “pass on” or honor percentage discounts from original orders.
Set store credit incentive - Specify a dollar amount to be offered as an incentive to the customer with the Store Credit outcome.
No label provided - Do not automatically generate a return label for the customer
To learn more about the top use cases for each of these, visit Loop's Workflows: Use Cases and Limitations article.
Saving and publishing
Once a workflow is built, merchants can saved it in a draft state or publish it live:
To save a workflow without setting it live, simply select the "Save draft" option in the header. This will save the workflow in a draft state and will not affect the returns experience.
To make the workflow live, simply select "Publish" from the header. This will save the workflow in an active state and immediately set the workflow live. All returns initiated after the time of publishing will be subject to the workflow.

Once a workflow is active, it can be modified using the "Edit mode" CTA in the header. An active workflow can also be deactivated by clicking the "Deactivate" CTA in the header.

Keep an eye out for updates from the Loop team as additional templates, conditions, and actions become available. Please reach out to support@loopreturns.com with any additional questions.
FAQ
Do I have to use one of the templates? No, the ability to create custom workflows can be leveraged using the 'create workflow' button.
What format should I have my SKUs, product tags, etc. in the CSV file that I upload? The CSV file should have 1 COLUMN with each identifier (be it SKU, tag, id, etc) in its own field going from the top to the bottom of the document.
Is Loop planning to create additional templates, conditions, and actions? Absolutely. Loop will continue to add conditions and actions to workflows as part of future releases. These additions will be reflected above and communicated through our product updates.
Can I replace my Return Policy Enforcer setup with Workflows? Yes. Workflows is built in a manner that can accommodate all Return Policy Enforcer functionality. A full migration of Return Policy Enforcer rules into Workflows will happen at a future date.
What if I have rules set up in both Workflows and Return Policy Enforcer? We encourage you to choose from one or the other, preferably workflows. If there are active rules in RPE and Workflows, the RPE rules will take precedence in the shopper return portal.
How does Workflows interact with existing Keep Item functionality present in a return policy? Workflows exist "above" a return policy, meaning if the criteria are met for the workflow it will override your regular return policy. If the workflow criteria are not met, the return will fall back to the policy.
When is a workflow officially "live"? A workflow becomes live as soon as the workflow is published. All returns created after the time of publishing will be subject to the workflow.
What happens if a return does not meet the criteria for a workflow? Workflows exist to provide alternate actions from your standard return policy. If the criteria for the workflow is not met the return will simply fall back to your regular return policy settings.
What if I have duplicate workflows? Which one gets priority? Workflows are prioritized according to the priority number in the admin, 1 being the highest priority. Use the drag and drop element or simply select a number from the dropdown to arrange the priority of your workflows
Is there a limit to how many workflows I can make? No. There is no limit to the number of workflows that can be created.
When does Workflows read tags? Order tags are read at the time of order lookup in the shopper return portal. Said another way, Loop will read the order tags present on the product and order when the customer looks up the order within Loop. This is different from FINAL_SALE and EXCHANGE_ONLY functionality in which tags are read from the time of purchase. Product tags can be read at the time of original purchase OR the time of lookup using Workflows.
What does the red exclamation point mean? This indicates an incomplete module that requires additional setup before the workflow can be published.
Do Loop's Final Sale and Exchange Only tag functionality take priority over Workflows? Yes, the final sale-only and exchange-only tags under Policy settings > General will take priority over workflows.
What is the customer experience if I utilize the Manual Review action? Your customers will be able to complete & submit their return in Loop but will be presented with the below messaging. This is customizable verbiage so update as needed!

How does Order Date "was placed between" read the dates outlined? All date-searching criteria, including "was placed between", use Coordinated Universal Time (UTC) starting at the beginning of the date(s) selected. For example, a search between 09/01/22 and 09/05/22 will include all orders placed on 09/01/22 but no orders placed on 09/05/22, since the search reads both dates at 00:00:00 UTC.
Please reach out to support@loopreturns.com with any additional questions.