
Create a Return for a Customer
OVERVIEW
This article explains how to create a return for a customer in Loop. It covers creating an exception return directly in the Loop admin, which lets your team issue a refund, store credit, or a size exchange without sending the customer through the return portal. It also covers how to find an order and start a return through the shopper return portal, which you'll still use for some exchanges. Use this article when a customer can't or didn't submit a return themselves, or when you need to make a one-time exception to your return policy.
Use the menu on the left to quickly navigate this article.
What it is
Loop gives you two ways to create a return for a customer:
Create return in the Loop admin: Your team creates the return directly in the admin, chooses the outcome and how the item comes back, and records why the exception was made. It supports refund, store credit, and exchanges for a different size of the same product.
Shopper return portal: Your team finds the order and walks through the return portal on the customer's behalf, exactly as the customer would.
Setup
Turn on admin return creation
Admin return creation is off until you turn it on. Follow the steps below to turn it on:
In the Loop admin, navigate to Returns management > Policy settings > General > Inventory & operations.
In the Return management section, turn on Admin return creation.
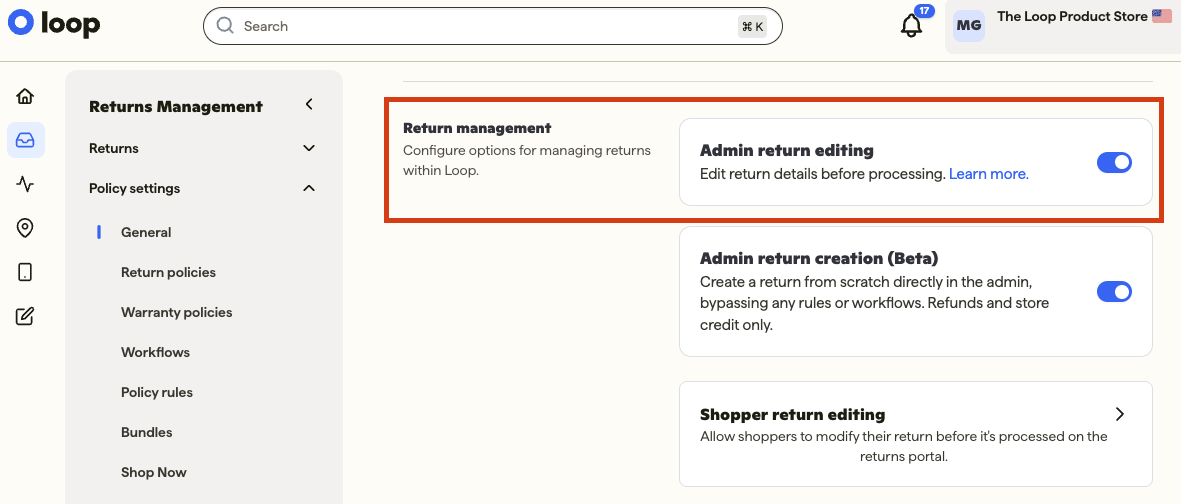
Click Save to apply your changes.
Note: Don't see the setting? Contact support@loopreturns.com.
Give your team permission
Once the setting is on, each team member who creates returns in the admin needs the Create Exception Returns permission. Most users have it by default. These roles include it:
Administrative actions
Organization Admin and Store Admin (for multi-store organizations using Loop Store Manager)
Return processing (with policy exceptions)
To let a team member create returns in the admin without full admin access, assign them the Return processing (with policy exceptions) role. Learn more about roles in User Accounts.
Create a return in the admin
Follow the steps below to create a return for a customer in the Loop admin:
Go to Returns Management > Returns > Return processing and click/tap the Create return button at the top of the page.

Look up the order. The order number, number of fulfilled items, and order date appear at the top of the page.
Under Select items, click the checkbox on each item the customer is sending back.
For each item, choose Credit or Exchange. For Exchange, pick the new size under Choose size. Sold-out sizes are crossed out. Exchanges in the admin are for a different size of the same product only. For either choice, choose a reason from the Return reason dropdown.
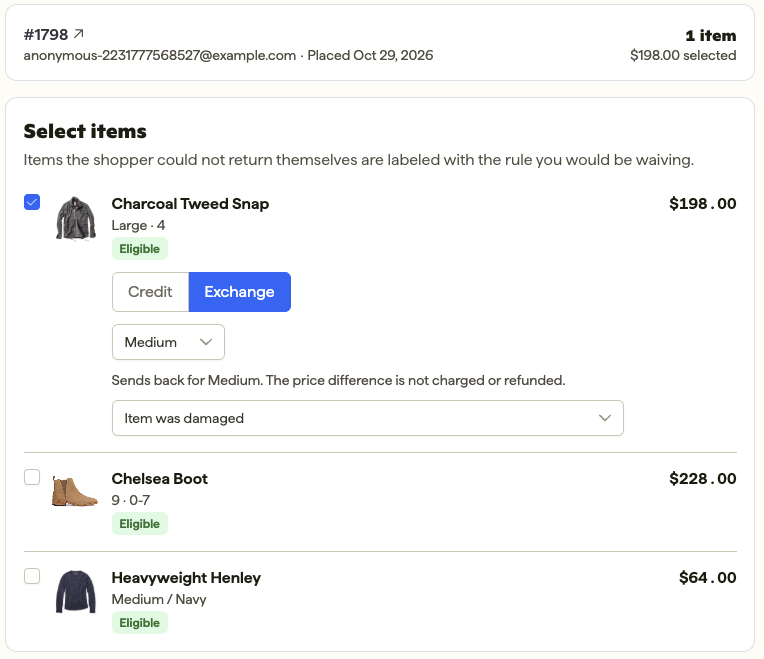
Under Review and create, go to What happens next.
If you're processing a Credit, choose an option from What the shopper receives for returned items:
Refund to the customer's original payment method
Store credit
If you're processing an Exchange, there is one default option: The shopper receives the replacement and no refund.
Under How the item will come back, choose how the customer returns the item:
Box and ship it
Happy Returns drop-off
Shopper sends it back on their own (no label)
Keep item (do not return)
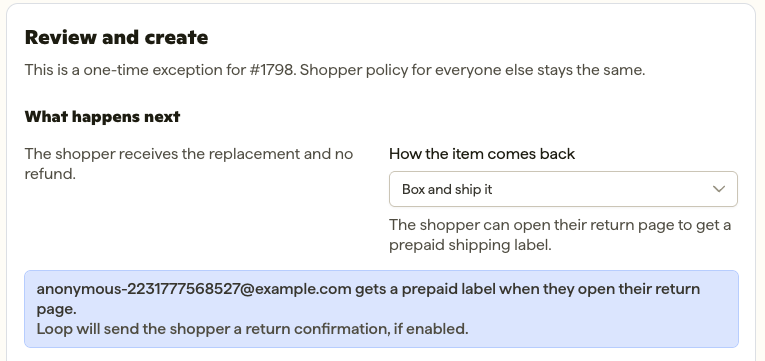
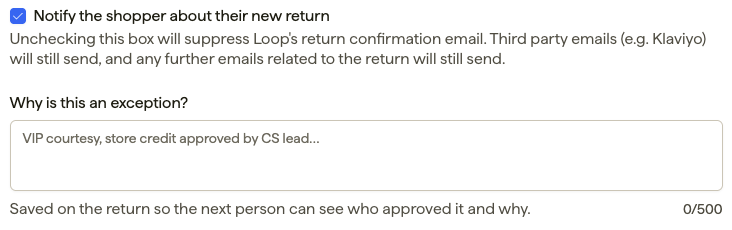
Leave Notify the shopper about their new return checked to email the customer their return details. Uncheck it if you'd rather notify them yourself. See What your customer sees below.
In Why is this an exception?, record why you're making this exception and approving the return manually.
Check the summary. If the return has a return fee, you can click Waive return fee to set the fee to $0, or Apply return fee to add it back.
Click Create return.
In the Review return window, confirm the outcome, return method, exception, and totals, then click Create return.
Tip: Be specific in What's the exception?, for example "VIP customer, approved by CX lead" or "Item arrived damaged, outside window." It's saved with the return, so anyone on your team can see later why the exception was made.
How it works
Your return policy still applies
Loop uses your return policy as the source of truth for admin-created returns wherever possible, including how totals are calculated. The only rules you're overriding are the eligibility rules you choose to waive for that return.
What you can and can't override
When an item doesn't meet your return policy, Loop shows a warning on that item, and you can still return it. You can override:
Return window has closed
Final sale
Item not yet fulfilled
Item not yet delivered
Item is hidden by a return policy rule
Item is otherwise unavailable for return
These can never be overridden:
The item has already been returned
There's an open shipping protection claim on the item
Return fees
Admin-created returns apply the same fees as a return the customer submits. Loop calculates return fees from your return policy and any fee rules in your workflows. That includes restocking fees, label and return shipping fees, and handling fees. Any fee shows in the return summary before you create the return, and you can waive it with Waive return fee. Writing an exception note doesn't remove fees.
To learn more about workflows, visit the Workflows article.
What your customer sees
When Notify the shopper about their new return is checked, Loop emails the customer about their new return. The email depends on the return method you choose. For Box and ship it, it includes the return confirmation, the shipping label, and packaging instructions.
Important: If you uncheck Notify the shopper about their new return, Loop won't email the customer. You'll need to let them know yourself, for example by emailing them or sharing their return status page.
Create a return through the shopper return portal
Use this method for exchanges to a different product, or for any outcome that needs the customer's card details.
Follow the steps below to find an order and start a return on behalf of your customer:
Click Find an order on the left side of the Loop admin, under Returns management.
Search by the customer's name, email address, or order number. All Shopify orders matching that name or email address appear.
When you find the correct order, click Start Return on the right side of the page.
Loop opens the order in the shopper return portal. From there, submit the return or exchange for any returnable items on the order. The process looks exactly the same as when a customer submits a return themselves.
Note: If you already have the customer's order information, you can also click Returns Portal at the bottom left of the Loop admin and start the return from there.
Important: The portal follows your return policy. To make an exception for an exchange through the portal, such as a final sale item, add the order to your Allowlist first, then remove it once the return is submitted. The customer can submit returns without restrictions while the order is on your Allowlist. Learn more about Listings.
FAQ
How can I make an exception for a return that's final sale or outside my return window? For a refund, store credit, or a size exchange, create the return in the Loop admin and override the warning on the item. You don't need to add the order to your Allowlist. For an exchange to a different product, add the order to your Allowlist first, then submit the return through the shopper return portal.
Can I submit a return directly in the Loop admin without going through the shopper return portal? Yes, for refunds, store credit, and exchanges for a different size of the same product. Exchanges to a different product and outcomes that need the customer's card still go through the shopper return portal.
Can I create an exchange in the Loop admin? Yes, for a different size of the same product. Choose Exchange on the item and pick the new size under Choose size. For an exchange to a different product, use the shopper return portal.
Can I waive the return fee when I create a return in the admin? Yes. In the return summary, click Waive return fee to set the fee to $0. Click Apply return fee to add it back.
Can I submit a different-priced exchange for my customer without their credit card info? No. A different-priced exchange or an Instant Exchange needs the customer's credit card information. If you charge handling fees on exchanges, you'll also need their card to process the request.
Can I find an order in the Loop admin using the order number or other criteria? Yes. With Find an order, you can search by order number, customer name, or customer email address.
Why don't I see the option to create a return in the admin? Check that admin return creation is turned on in Settings > General > Inventory & operations, and that your user role includes the Create Exception Returns permission.
Why can only some of my team members create returns in the admin? Make sure each team member's user role includes the Create Exception Returns permission. To give it to someone without full admin access, assign them the Return processing (with policy exceptions) role. Learn more in User Accounts.
Can I create a lot of returns this way? Yes, but it's a manual process. Each return is created one at a time, and the tool isn't built for creating returns in bulk.
Where can I see who created a return and why? Open the return and check its history. Returns created in the admin include a note that the return was created on the customer's behalf, along with the exception your team recorded.
Does Critical Risk Protection hold returns created in the admin? Not when policy enforcement is waived. Returns created in the Loop admin with policy enforcement waived are excluded from the Critical Risk Protection hold. Learn more in Fraud Tools.
Please reach out to support@loopreturns.com with any additional questions.