Shop Now: On-Store Setup (Manual)
This article pertains to merchants with the original version of On-Store that requires manual code entry to activate. If setting up On-Store for the first time, Loop recommends following setup steps from the On-Store setup (embedded) article.
For those with the original On-Store setup who want to switch to the embedded On-Store setup, please review Loop's On-Store switching instructions.
OVERVIEW
Loop's Shop Now: On-Store feature uses a store's product collections in Shopify to encourage shoppers to make exchanges instead of returns. The resulting exchanges help merchants retain and increase revenue.
Important: These setup instructions are for merchants using Shopify's theme builder. If a merchant does not use Shopify themes or creates their own, they probably have a "headless" Shopify store. Headless means that the store is built with the front end separate from the back end so that shopper-facing updates don’t affect back-end performance. For headless setup, go to Loop's On-Store headless setup article instead.
How it works
The Shop Now: On-Store experience has two parts:
The Shop Now feature lets a shopper exchange an item they bought with any other item from the store's catalog while they're still in the Loop portal.
The On-Store version of Shop Now brings the shopper directly to the store's website to make this new purchase before returning to Loop.
Shop Now: the On-Store shopper experience
Set up Shop Now: On-Store
Follow the instructions below to set up the On-Store feature. After doing these steps, merchants can choose to set up more details based on their store’s specific needs.
Notes:
Loop recommends saving a backup of your previous theme before publishing the new one. Please contact a developer on your team, your Merchant Onboarding Manager, or support@loopreturns.com for help saving a backup.
These instructions are for the Chrome browser, but the steps will look generally similar in any browser.
Get On-Store into Shopify's theme editor
Because the current theme is likely not set up for On-Store, merchants must create a new theme to connect to the On-Store feature. Play the video below or review the written instructions beneath it to learn how to set up a new theme. The video covers instructions before the "Fill in the blanks" header.
Set up a development theme in Shopify
First, set up a space in the store's Shopify account to enable the On-Store experience:
Open the Shopify admin page in a separate tab or window in the browser.
On the left sidebar, click Sales channels.
Click Online Store when the pop-up window appears.
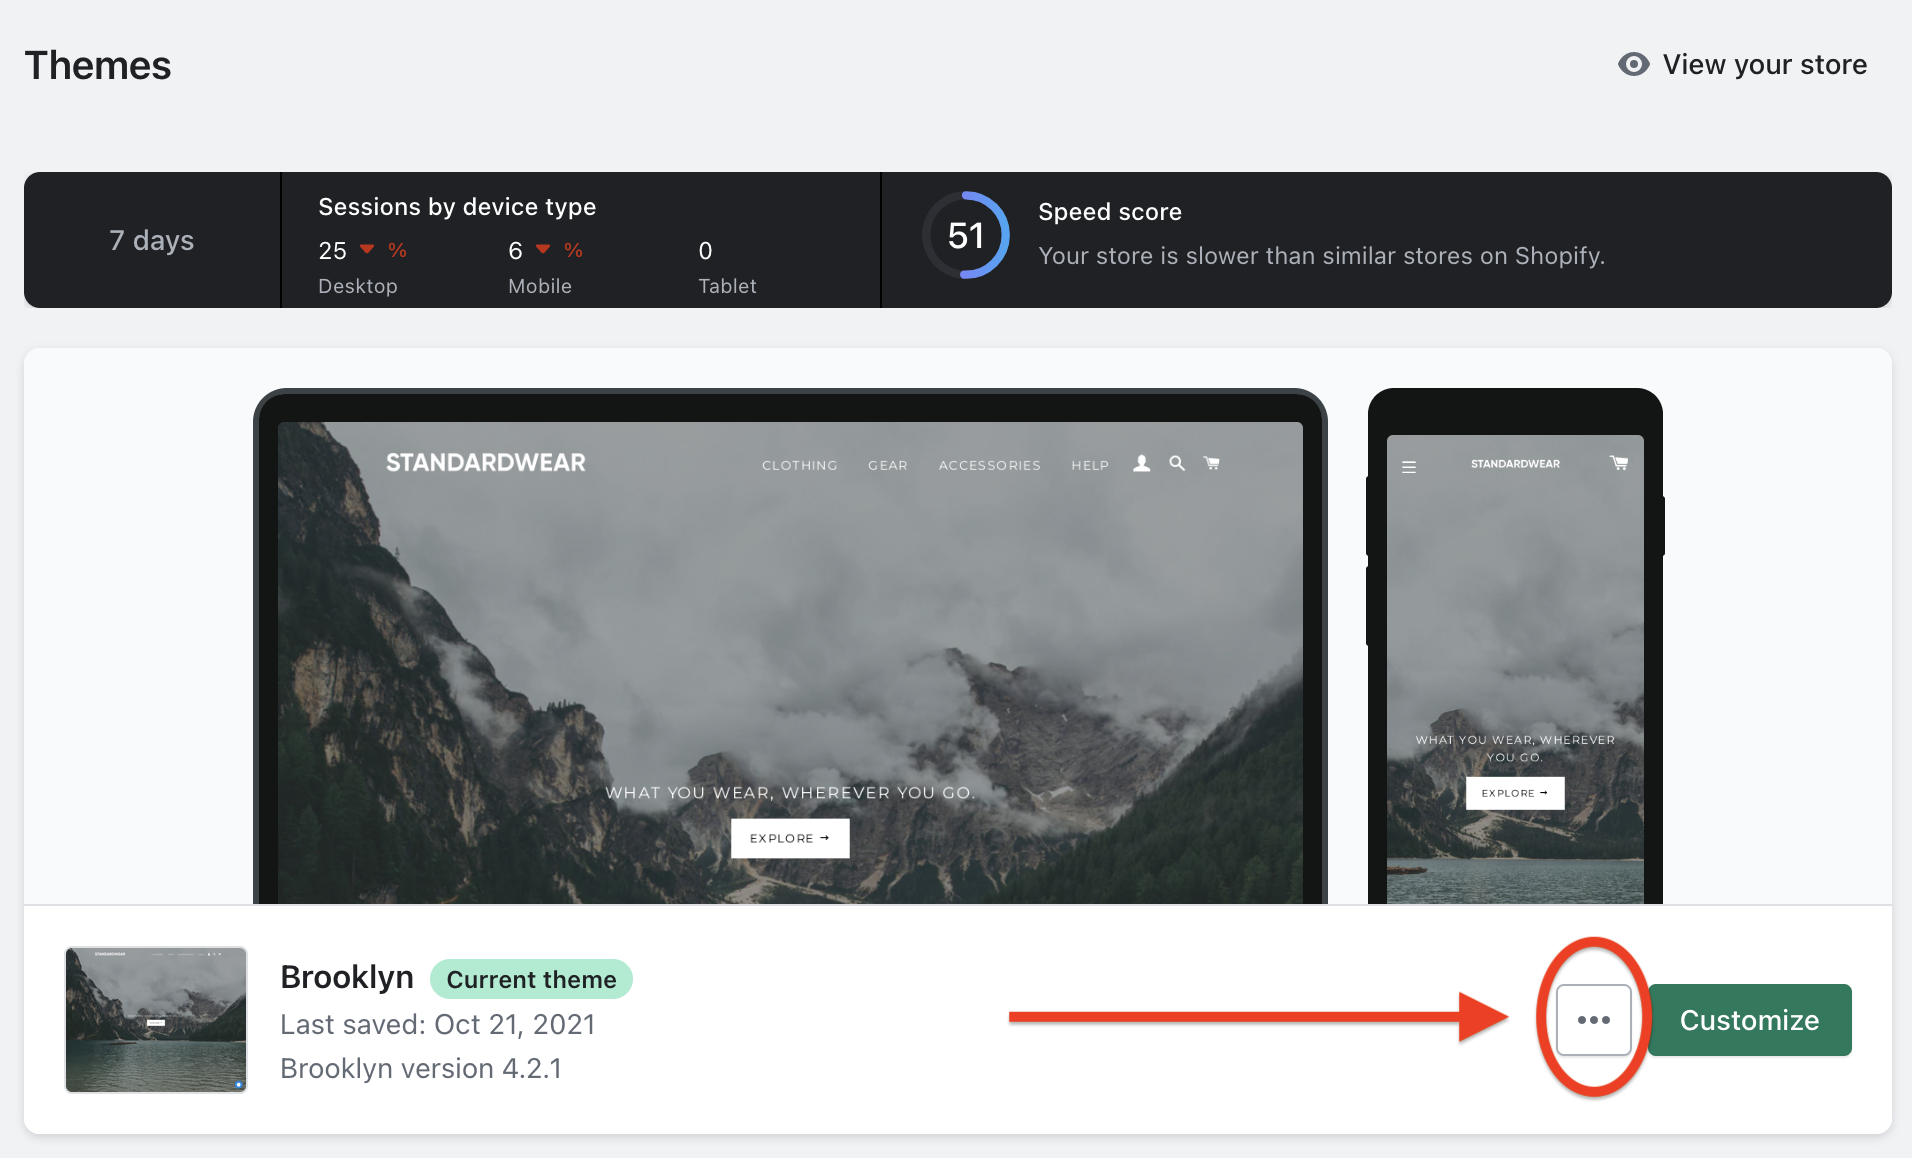
After the page loads, the store's current live theme should appear in the middle of the screen. Click the ellipsis button (a set of three periods) on the right side of the current live theme.
From the ellipsis menu, click Duplicate. A copy of the current theme will appear in the "Theme library" section of the page with a “Just Added” tag next to the “Copy of [theme]” title.
Important: Do NOT click Publish on the new theme yet, as doing this will activate the new theme before setup is done.
Rename the new theme as needed:
Add a snippet to the development theme
Important: Do NOT click Publish on the new theme yet, as doing this will activate the new theme before setup is done.
A snippet is a reusable block of code, similar to a paragraph in a textbook. Saving these can help merchants reuse good pieces of code in the future.
Loop has already written the snippet for its On-Store merchants! Just insert it into the theme code by following the instructions below:
On the new theme, click the ellipsis button > Edit code. This will load Shopify’s theme editor.
Under the Layout folder on the left, click the file titled “theme.liquid”.
Locate the closing body tag (
</body>
), as the snippet will go above this line. Find</body>
using one of the ways below:Scroll to the bottom of the code window and look for the tag there.
Press Control F (Command F on a Mac) at the same time on the keyboard to activate the finder tool. In the finder’s text field (probably in the top right of the screen), type
</body>
. Then, press Enter on the keyboard. The finder will highlight</body>
in the code.
Return to this instruction page. Highlight and Copy the On-Store script below:
<script src="https://cdn.jsdelivr.net/npm/@loophq/onstore-sdk@latest/dist/loop-onstore-sdk.min.js"></script>
<script>
LoopOnstore.init({
key: "example api key",
attach: "example attach value",
});
</script>
Go back to the Shopify theme editor. Click in front of
</body>
in the code, then Paste the highlighted script. This should place the script directly above the</body>
tag so that it looks like the screenshot below:Click Save in the upper right corner of the theme editor window.
Fill in the blanks
Next, plug in the remaining values for the On-Store snippet. To learn how to set up the new theme, play the video below or review the written instructions beneath it. The video covers instructions before the "Test your work" header.
Add the API key
To add the API key to the On-Store snippet:
Open a new browser tab or window and go to Loop admin.
On the left, click Return management > Tools & integrations > Developer tools.
Scroll down to the “API keys” section.
Ensure that the Scopes column shows the chosen API key as “Cart” only. (Including more scopes could expose returns data. Create a Cart-only API key if one doesn't exist yet.)
Copy the API key from the “Key” column.
Go back to the theme editor and find the previously copied-and-pasted On-Store snippet.
Replace “example api key” with the API key. Be sure to keep the quotes around it!
Click Save in the upper right corner of the theme editor window.
Add the attach identifier
To add the attach value to the On-Store snippet:
Open the Shopify store in a new tab.
Right-click the checkout button and select Inspect to open the Inspector Tool.
In the highlighted part of the Inspector Tool, find the ID or Class (this will look like “id=‘[id]’” or “class=‘[class]’”). These are unique identifiers for the checkout button.
Copy the part in quotes for ID or Class; either one will do.
Tip: If a unique ID does not exist for the checkout button, add one. One also may be available in Snippet > “cart-template.liquid” in the theme editor. However, the placement depends on the particular theme. For help, please reach out to support@loopreturns.com.
In the Shopify theme editor, find the previously copied-and-pasted On-Store snippet.
Replace “example attach value” with the identifier, keeping the quotes around it.
Click Save in the upper right corner to make sure all of the changes keep!
Important:
When adding identifiers, a hash (#) should always proceed an ID, and a period (.) should always proceed a Class.
If a store has multiple checkout buttons with different Classes or IDs, merchants can add multiple attach values to this code by separating each value with a comma (,). The code will not function unless the commas are present between values. A correct example is below:
attach="#checkout, .checkout-btn"
Great job! Later, when publishing the new theme, this code will activate the Shop Now: On-Store experience automatically for shoppers coming from Loop. Adding the API key to the On-Store snippet also lets the store code talk to Loop’s API.
Test your work
Now, test the work that was done to make sure On-Store is functioning as expected.
Tip: Loop highly recommends using a developer’s or engineer’s help here.
Test the setup
To test:
Click Save in the theme editor to make sure all of the changes stick.
Click the back arrow on the theme editor page to return to the Shopify themes.
On the theme being edited, click the ellipsis button > Preview.
Right-click anywhere on the new Preview tab and select Inspect.
Click the Console tab at the top of the Inspector Tool. If struggling to find the Console tab, try clicking the carrot symbol to show more options.
Scroll to the bottom of the code in the Console tab.
Type “LoopOnstore.testMode()” at the very end of the code. (Or, copy and paste it from here.)
Press Enter on the keyboard. A credit banner should appear at the bottom of the Preview page:
If a credit banner doesn't appear, return to the snippet section to make sure the script was installed correctly. If this doesn't help, please contact support@loopreturns.com.
Test the checkout button(s)
Merchants must also test the checkout button to confirm that the Loop.submit function works. Below the GIF (graphics interchange format) visual are written instructions to follow.
Important: if the shop provides multiple checkout buttons (for example, in both a side cart and a cart page), Loop suggests testing all checkout buttons separately using the instructions below.
To test the checkout button(s):
In the theme’s Preview tab, add any product to the cart.
Right-click anywhere to open the Inspector Tool again and click the Networktab.
Underneath the tab names, make sure the "Preserve log" checkbox is selected. If it isn’t, click the “Preserve log” square to select it.
Click the checkout button in the cart within Shopify. Again, click each separate checkout button on the website. Doing so should display a screen pop-up saying “Test Mode Successful”:
Developers can also check that no unexpected responses or errors appear under the Network tab.
Tip: If the "Test Mode Successful" pop-up does not appear when clicking the checkout button(s), please review Loop's On-Store troubleshooting article to double-check the setup. For more testing help, please contact support@loopreturns.com.
Troubleshoot if needed
Clicking the checkout button should display a pop-up on the screen saying “Test Mode Successful”:
If the pop-up does not appear, double-check the following:
A call to “api.loopreturns.com/api/v1/cart/” should appear under Inspector Tool > Network > Names.
When clicking on the API call above, a few sub-tab options will appear. Clicking the Payload sub-tab should show the array of variant IDs.
When clicking on the Response sub-tab, a token should appear.
For more troubleshooting, please refer to Loop's On-Store troubleshooting article.
Optional setup details
Once tests are successful, merchants can visualize this integration on their site. However, Loop recommends also reviewing the optional setup steps before publishing the new theme, in case the store has additional needs Loop can help resolve. Please consider the article above with a developer before continuing. After setting up anything else needed, continue below.
Publish Shop Now: On-Store
After setup and testing, publish the theme! Below the GIF are written instructions to follow.
To publish the On-Store theme in Shopify:
Go to Shopify admin > Sales channels > Online Store.
Click the Publish button next to the theme being published. This will immediately display the new theme on the storefront.
Notify your Onboarding Specialist or email us at support@loopreturns.com!
Tip: A developer can also make a call directly in their browser to “LoopOnstore.isActive()” to confirm that a shopper will have the On-Store experience.Final step! To allow customers to access On-Store through the portal, please make sure enable On-Store under your return policy.
FAQ
What plan do I need to be on to utilize this feature? To check to see if this feature is included in your plan, please review the Pricing page on the Loop Returns website. If you're interested in this adding this feature, please contact your Merchant Success Manager or support@loopreturns.com.
Now that I’ve integrated the Shop Now: On-Store experience, can I still safely edit my theme? Absolutely! Loop recommends you save a backup of your previous theme and test the On-Store experience thoroughly after making any changes. Refer to the “Test the setup” section of this article for testing instructions.
I made a theme change and now my checkout button isn’t working correctly through the Shop Now: On-Store experience. What should I do? Review the steps for “Set up a development theme in Shopify“ and “Add a snippet to the development theme“ above. If the problem continues, please contact your Merchant Onboarding Manager or support@loopreturns.com.
Where can I find my Shop Now: On-Store API key? You can locate your API key under Loop admin > Returns management > Tools & integrations> Developers tools.
How does Loop choose which Products to display in the Shop Now preview?
For Shop Now: In-App, the preview displays products available in the top level menu item that match the original products' Product Type. If no products match the original product's Product Type, Loop will display the next available products in the top level menu item.
For Shop Now: On-Store, the preview will not display any product images unless you select "Import Collections" in the Shop Now tab of your admin. Once selected, add a menu item and then the preview will display products that match the original products' Product Type.
For further questions, please contact your Merchant Onboarding Manager or support@loopreturns.com.